Add Camera Rigs

This script was designed to add some extended functionality to a camera by creating control rig with custom shapes and UI to easily access the cameras settings from the 3D View.
激活
打开Blender,打开用户偏好设置下的插件栏。
Click Camera then Add Camera Rigs to enable the script.
描述
After activating the add-on, it will place two menu items in the Add ‣ Camera menu. They are Dolly Rig and Crane Rig.
Both rigs are very similar except the “Crane Rig” has two extra adjustable bones (Arm Height and Arm Length) to make it easier to achieve a cinematic crane shot.
使用
Add a Add ‣ Camera ‣ Dolly Camera Rig or Crane Camera Rig. This will build the rig at the cursor location, add a new camera, making it the new active scene camera.
When the Rig is selected, the camera properties will be displayed in the Sidebar.
Rigs
Root bone
This is the parent of the entire rig.
Control bone
This is the bone (named Ctrl) that will translate the camera around. By default it will track to the aim bone.
Aim bone
The camera will point at this bone (named Aim). You can also tilt the camera by rotating the aim on the Y axis.
Widgets
When the rig(s) are built, the add-on will create a collection for all the custom bone shapes called (named WDGTS_camera). When the custom shapes (widgets) are built they will use the prefix WDGTS_camera. If you have more than one rig in the scene, it will use the same widgets in the same collection rather than duplicating them. The default collection name and the widget prefix can be set in the preferences of the add-on. (This will not change the name of any existing widgets or collection, only ones that are created after you change the setting.)
UI
The UI will display most of the useful camera settings. I will only explain the added features here, for more information check out the 相机.
Add DOF Empty
The Add DOF Empty button will automatically add an empty at the location of the aim bone and make it the depth of field (DOF) object.
The empty is a child of the aim bone, so you can animate that instead of animating the empty directly. This is a workaround as it only possible to use objects as a target for the DOF and not bones.
Focal Distance/F-Stop/Focal Length
These are custom properties on the camera bone that drive the equivalent setting on the actual camera. This makes it animatable inside the armature object rather than having to animate the armature and the camera.
Show in Front
Will make the rig object visible through all other geometry. (Useful if you have a fly through scene or if other meshes are in the way.)
Lock Camera Select
The Lock Camera Select is a toggle button to make the camera unselectable (so you can’t accidentally delete it).
Tracking (Aim Lock)
This slider controls the Track To constraint on the control bone. Turn it off and the bone will not point to the aim bone anymore.
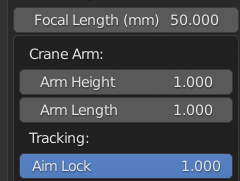
Crane Rig Height, Arm Length
The Arm Height and Arm Length sliders at the bottom of the UI show the Y axis scale of the relevant bone. By default, both the height and the arm length are at 1 unit in size. These values only show in the UI when a crane rig is selected, they are also animatable.
Multiple Cameras
It is possible to add as many rigs as your scene needs. The Make Camera Active will appear if the camera attached to the selected rig is not the active camera. By pressing this, it will make this camera the active one. If you wish to switch active cameras during an animation, check out the Camera Switching section below.
Camera Switching
If you wish to switch cameras during an animation you can do this with the Add Marker and Bind button. This uses Blender’s built-in camera binding tool to a Timeline marker. When pressed, it will add a marker to the Timeline and bind it to the camera controlled by the selected rig. Go to another frame, select a different camera rig and press it again. Now you have two markers and when you scrub the time line you will see the active camera switch accordingly. (repeat this process as many times as needed) This markers can then also be dragged around in the time to change the frame in which they will switch.
问题排查
If the Aim tracking is not functioning check that you have “Auto Run Python Scripts” enabled in the Preferences Preferences ‣ Save & Load ‣ Auto Run Python Scripts.
If the UI stops working, perhaps you have parented an object to the rig? At the moment If you parent an object to the rig with a name that precedes the camera name alphabetically, the UI can’t load. E.g. The Default camera name for the Dolly is “Dolly Camera”. If you parent an object called “E” it will work. But an object called “A” will fail.
See also
The Author’s Github Repository.
参考
目录
相机
描述
Adds a camera rig with a UI.
坐标
3D View ‣ Add ‣ Camera
文件
camera_dolly_crane_rigs.py
作者
Wayne Dixon, Brian Raschko, Kris Wittig
维护人员
to do
许可证
GPL
支持级别
社区版
提示
这个插件和Blender捆绑在一起。