UV Tools
参考
编辑器
3D 视图
模式
编辑模式
菜单
Header ‣ UV
快捷键
U
Blender提供了几种UV映射方式。比较简单的投影方法使用三维空间到二维空间的映射公式,将点的位置朝点/轴面确定的表面插值。更高级的方法可以用于更加复杂的模型,并有更具体的用途。
展开
参考
编辑器
3D Viewport or UV Editor
模式
编辑模式
菜单
UV ‣ 展开
快捷键
U
Flattens the mesh surface by cutting along seams. Useful for organic shapes.
Begin by selecting all faces you want to unwrap. In the 3D Viewport, select Mesh ‣ UV Unwrap ‣ Unwrap or U and select Unwrap. You can also do this from the UV Editor with UVs ‣ Unwrap or U. This method will unwrap all faces and reset previous work. The UVs menu will appear in the UV Editor after unwrapping has been performed once.
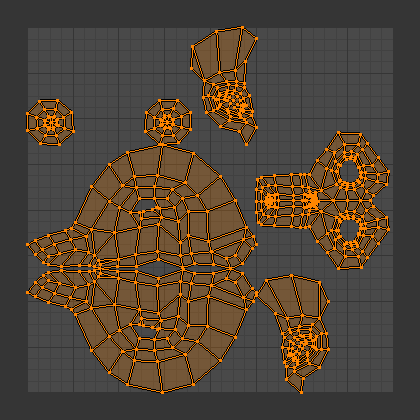
猴头的展开结果。
This tool unwraps the faces of the object to provide the “best fit” scenario based on how the faces are connected and will fit within the image, and takes into account any seams within the selected faces. If possible, each selected face gets its own different area of the image and is not overlapping any other faces UVs. If all faces of an object are selected, then each face is mapped to a part of the image.
选项
Blender has two ways of calculating the unwrapping. They can be selected in the tool setting in the tool panel in the 3D Viewport.
基于角度
该方法提供了不错的网格的二维表达。
拱形
使用LSCM (Least Squared Conformal Mapping)。UV映射效果通常没有基于角度准确,不过对于简单物体效果更好。
填充洞面
启用填充洞面,可以防止重叠,并更好地在UV区域中表示洞面。
校正高宽比例
根据图形比例计算UV宽高比。
使用表面细分修改器
映射UV时考虑细分修改器作用后的顶点位置。
边距
UV孤岛之间的间距。
Tip
一个面的UV纹理只需用到图像的 部分 ,而不是 整张 图像。同样地,多个面可以共用图像的同一部分。这样面映射后占用的图像会更少。
智能UV投射
参考
编辑器
3D 视图
模式
编辑模式
菜单
UVs ‣ Smart UV Project
快捷键
U
Smart UV Project, cuts the mesh based on an angle threshold (angular changes in your mesh). This gives you fine control over how automatic seams are be created. It is good method for simple and complex geometric forms, such as mechanical objects or architecture.
该功能会检测物体的形状,选中面以及其与其他面的关系,根据这些信息和用户设置的参数创建UV映射。
In the example below, the Smart Mapper mapped all of the faces of a cube to a neat arrangement of three sides on top, three sides on the bottom, for all six sides of the cube to fit squarely, just like the faces of the cube.
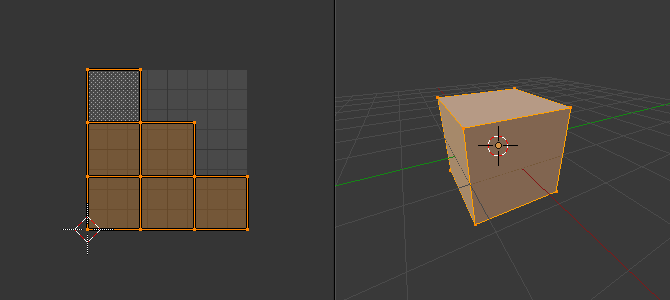
立方体的智能UV投射。
For more complex mechanical objects, this tool can quickly and easily create a regular and straightforward UV layout for you.
选项
工具栏的 调整上一步操作 面板提供了对网格展开方式的精细控制:
角度限制
控制面的分组方式:值越高,分组越多越小,不过畸变更小;值越低,分组越少,代价是畸变更多。
孤岛边距
This controls how closely the UV islands are packed together. A higher number will add more space between islands.
区域权重
计算较大面积面对投影矢量的权重。
光照贴图拼排
参考
编辑器
3D 视图
模式
编辑模式
菜单
UVs ‣ Lightmap Pack
快捷键
U
Lightmap Pack takes each of a mesh’s faces, or selected faces, and packs them into the UV bounds. Lightmaps are used primarily in realtime rendering, where lighting information is baked onto texture maps, when it is needed to use as much UV space as possible. It can also work on several meshes at once. It has several options that appear in the Toolbar:
用在单个网格的话,可以设置为仅映射 选中的面 或 所有的面。
选定的网格物体 选项用于多个网格。要使用此选项,在 物体模式 选择多个网格物体,然后进入 编辑模式 ,并启用该选项。
选项
共享纹理空间
用于映射多余1个网格,尝试将所有物体的面不重合地排布在UV边界内。
新UV贴图
如果映射多个网格,该选项用于为每个网格新建一个UV映射。参见 UV 贴图。
新建图像
为每个网格指定新的图像,不过在启用 共享纹理空间 时,仅新建一张图像。
图像尺寸
设置新建图像的尺寸。
拼排品质
在执行复杂的盒装拼排前,执行预拼排。
边距
This controls how closely the UV islands are packed together. A higher number will add more space between islands.
沿活动四边面展开
参考
编辑器
3D 视图
模式
编辑模式
菜单
UVs ‣ Follow Active Quads
快捷键
U
沿活动四边面展开工具沿连续的面循环展开选中面,即使网格面是非常规形状的。要注意的是,展开时不会考虑图像尺寸,所以可能需要稍微缩放一点,以匹配图像区域。
选项
Edge Length Mode
均匀
统一所有UV面为同一尺寸。
长度
Todo.
Length Average
对每个循环边上的边长度取平均值。
Note
需要注意的是,这里匹配的是活动四边面在UV空间中的形状,而非三维空间中的形状。要获得整齐的90度展开,在使用 沿活动四边面展开 前,要确保活动四边面在UV空间中是矩形。
块面投影
参考
编辑器
3D 视图
模式
编辑模式
菜单
UVs ‣ Cube Projection
快捷键
U
Cube Projection maps the mesh onto the faces of a cube, which is then unfolded. It projects the mesh onto six separate planes, creating six UV islands. In the UV editor, these will appear overlapped, but can be moved. See Editing UVs.
选项
矩形尺寸
设置投射至的立方体尺寸。
通用选项
下面是块面、柱面、球面映射的通用设置:
校正高宽比例
映射UV时将考虑图像的宽高比。如果图像被映射到非方形的 纹理空间 ,投射将考虑到这一点,扭曲映射来确保表面上的准确。
裁剪至边界框
裁剪位于(0到1)范围外的UV,移动至UV空间中的最近边界。
缩放至边界框
如果UV超出(0到1)范围,会缩放至匹配UV边界。
Cylinder & Sphere Projection
参考
编辑器
3D 视图
模式
编辑模式
菜单
UVs ‣ Sphere Projection UVs ‣ Cylinder Projection
快捷键
U
柱面和球面映射有相同的设置。区别在于柱面映射会将UV投影至柱面形状,而球面映射则考虑球面的曲率,并且纬度线均匀分布。用于球形物体,如眼睛、行星等。
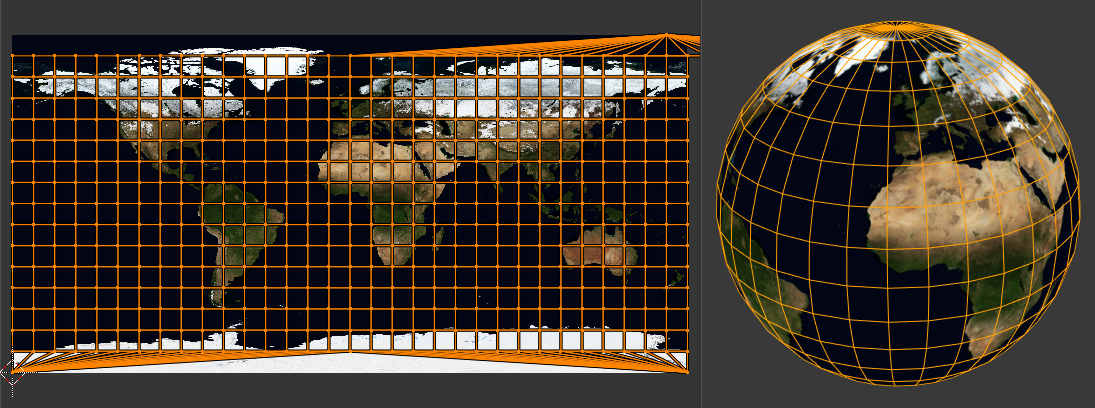
墨卡托图像搭配球面投射使用。
一般来说,展开柱体(管道)就如同纵向剖开,再平摊开来,所以Blender希望 竖着 摆放管道,观察视角垂直于物体。不同的视角会将管子投射为不同的UV,图像也要随之倾斜。不过,你可以手动设置计算的轴向。球面映射也是一样的思路:
Recall the opening cartographer’s approaching to mapping the world? Well, you can achieve the same here when unwrapping a sphere from different perspectives. Normally, to unwrap a sphere, view the sphere with the poles at the top and bottom. After unwrapping, Blender will give you an equirectangular projection; the point at the equator facing you will be in the middle of the image. A polar view will give a very different but common projection map. Using an equirectangular projection map of the earth as the UV image will give a good planet mapping onto the sphere.
选项
方向
查看极向轴
从上向下(极向)观察时使用。
赤道视图
观察赤道时使用。
对齐至物体
使用物体的变换计算轴向。
对齐
选择朝上的轴向。
ZX极轴
极点0位于X轴。
ZY极轴
极点0位于Y轴。
半径
使用的柱体半径。
从视角投影
参考
编辑器
3D 视图
模式
编辑模式
菜单
UVs ‣ Project from View
快捷键
U
Project from View takes the current view in the 3D Viewport and flattens the mesh as it appears. Use this option if you are using a picture of a real object as a UV Texture for an object that you have modeled. You will get stretching in areas where the model recedes away from you.
选项
见 通用选项 。
正交
应用正交投影。
从视角投影(限界)
参考
编辑器
3D 视图
模式
编辑模式
菜单
UVs ‣ Project from View (Bounds)
快捷键
U
与 从视角投影 一样,不过默认勾选 缩放至边界框 和 校正宽高比。
重置
参考
编辑器
3D 视图
模式
编辑模式
菜单
UVs ‣ Reset
快捷键
U
重置UV,将每个面映射为填充整个UV栅格,赋予每个面同样的映射。
If you want to use an image that is tileable, the surface will be covered in a smooth repetition of that image, with the image skewed to fit the shape of each individual face. Use this unwrapping option to reset the map and undo any unwrapping (go back to the start).