属性
形状
参考
模式
所有模式
面板
Properties ‣ Text ‣ Shape
形状 面板中的大多数设置与 曲线 数据块共享,详情请参阅这些设置。
快速编辑
不填充编辑模式下的字母,只显示它们的轮廓。
纹理空间
每个物体可以有一个自动生成的 UV 映射,可以在这里调整这些映射。
详见 生成的UV属性。
几何数据
参考
模式
所有模式
面板
属性编辑器(Properties) ‣ 物体数据(Object Data) ‣ 几何数据(Geometry)
偏移量
偏移定义字母的曲线的控制点,这将使它们更薄或更厚。 小心使用,很有可能产生某些错误……
挤出,锥化和倒角
该面板的其余设置(用于为字母提供体积)也与 曲线 数据块共享,有关详细信息,请参阅这些设置。
Note
锥形物体影响效果取决于如何构建定义字母的曲线。 结果通常看起来很随机……
Note
倒角 应用于定义字母的曲线,这意味着倒角时通常会跟随它们的轮廓而进行(将会有两条平行的被倒角曲线,而不是一条,正如人们所期望的那样)。
字体
参考
模式
所有模式
面板
属性编辑器(Properties) ‣ 物体数据(Object Data) ‣ 字体(Font)
Blender comes with a built-in font by default that is displayed in each of the four font style data-block menus. The built-in font is always present and shows in this list as “Bfont”. The data-block menu contains a list displaying the currently loaded fonts. Select one for each font style.
To load a different Font, click one of the Load buttons in the Font panel and navigate to a font file. The File Browser will give all valid fonts a capital “F” icon.
If you select a font that is unsupported by Blender, you will get the error Not a valid font.
Note
Location of Fonts on Unix
Fonts are typically located under /usr/lib/fonts, or some variant like /usr/lib/X11/fonts, but not always. They may be in other locations as well, such as /usr/share/local or /usr/local/share, and possibly related sub-trees.
Remember that the same font will be applied to all chars with same style in a text, but that a separate font is required for each style. For example, you will need to load an Italics font in order to make characters or words italic. Once the font is loaded you can apply that font “Style” to the selected characters or the whole object. In all, you would need to load a minimum of four different types of fonts to represent each style (Normal, Italics, Bold, Bold & Italics).
It is important to understand, that Blender does not care what font you load for “normal”, “bold”, etc., styles. This is how you can have up to four different fonts in use in the same text, but you have to choose between different styles of a same font, or different fonts. Blender has a number of typographic controls for changing the style and layout of text, found in the Font panel.
粗体
Toggled with the Bold button before typing. Text can also be set to bold by selecting it then using the Bold entry in the Text menu of the 3D Viewport.
斜体
Toggled with the Italic button before typing. Text can also be set to italic by selecting it then using the Italic entry in the Text menu of the 3D Viewport.
下划线
启用下划线,由下面的 下划线设置 所控制。
小型大写
启用此选项可将字符键入为小型大写字母。
小型大写 的尺寸可以通过 小型大写缩放设置 来改变。
变换
尺寸
控制整个文本的大小(无法独立控制每个字符大小)。 但请注意,具有不同字体(不同样式,见下文)的字符可能具有不同的可见大小。
切变
控制整个文本的倾斜度。 尽管看起来很相似,但这与斜体样式不同。
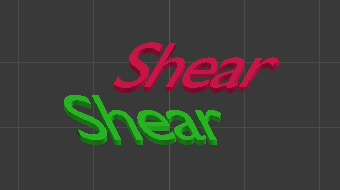
切变的例子。
物体字形
允许单个物体用于渲染字体,可以在Blender中创建/建模属于自己的复杂字体! 该字段用于选择要用于定位用于键入的各个字符的物体前缀名称(物体“族”)。 这是一个非常复杂的过程,因此这里有详细的步骤:
创建字体字符,每个字符可以是任何物体类型(网格,曲线等)。 它们必须在命名方案后面都有一个名称:“通用前缀”后跟“字符名称”(例如“ft.a”,“ft.b”等)。
For the text object, enable Instancing Vertices.
在 物体数据 选项卡中,使用“字体”物体的“公共前缀”来填充 物体字形 字段。 现在,每当文本中的字符与“字体”物体名称的 后缀部分 匹配时,此物体就会复制到该字符上。
Note
物体是重复的,因此它们的中心位于相应字符的 右下角 。
曲线路径文本
用来选择一个曲线,来让文本物体跟随它。
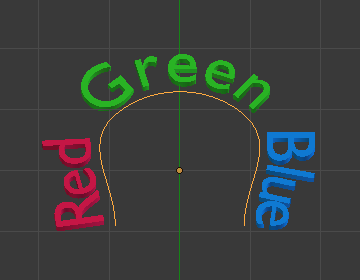
曲线上的文本。
Tip
应该使用 曲线修改器,它提供更多控制,是现在Blender中实现此类效果的标准方法。
下划线
在键入之前用 下划线 按钮切换。 通过选择文本然后使用 3D视图 的 文本 菜单中的 下划线 条目,也可以将文本设置为加下划线。
下划线位置
这允许垂直移动下划线的位置。
下划线厚度
这控制下划线的粗细。
小型大写缩放
缩放应用于大写字母,将它们变成小型大写字母。
Paragraph
参考
模式
All
面板
Properties editor ‣ Font ‣ Paragraph
The Paragraph Panel has settings for the alignment and spacing of text.

The Paragraph panel.
Alignment
Horizontal Alignment
Left
Aligns text to the left of the frames when using them, else uses the origin of the text object as the starting point of the text (which grows to the right).
Center
Centers text in the frames when using them, else uses the origin of the text object as the mid-point of the text (which grows equally to the left and right).
Right
Aligns text to the right of the frames when using them, else uses the origin of the text object as the ending point of the text (which grows to the left).
Justify
Only flushes a line when it is terminated by a word-wrap (not by a newline), and uses white-space instead of character spacing (kerning) to fill lines.
Flush
Always flushes the line, even when it is still being typed-in. It uses character spacing (kerning) to fill lines.
Note
Both Justify and Flush only work within frames.
Vertical Alignment
Top Base-Line
With text boxes, aligns the ‘top’ base-line of the text to the top of the frames.
With no text box, aligns the actual base-line of the text to the origin of the object, and grows to the bottom.
Note
That difference of reference point in the first line depending on usage of boxes or not is indeed confusing.
Top
With text boxes, aligns the top of the text to the top of the frames.
With no text box, aligns the top of the text to the origin of the object, and grows to the bottom.
Center
With text boxes, centers the text in the frames.
With no text box, centers the text on the origin of the object, and grows in both top and bottom directions equally.
Bottom
With text boxes, align the bottom of the text to the bottom of the frames.
With no text box, align the bottom of the text to the origin of the object, and grows to the top.
Bottom Base-Line
With text boxes, aligns the base-line of the text to the bottom of the frames.
With no text box, aligns the base-line of the text to the origin of the object, and grows to the top.
Spacing
Character Spacing
A factor by which space between each character (kerning) is scaled in width.
In Edit Mode in the 3D View, you can also control individual kerning at text cursor position by pressing Alt-Left / Alt-Right to decrease/increase it.
Word Spacing
A factor by which white-space between words is scaled in width.
Line Spacing
A factor by which the vertical space between lines is scaled.
Offset X/Y
These settings control the X and Y offset of the text position within the object. This applies relatively to the object’s origin, either to the whole text or, when using text boxes, to each frame.
Text Boxes
参考
模式
All
面板
Properties editor ‣ Font ‣ Text Boxes
Text boxes (or frames) allow you to distribute the text among rectangular areas within a single text object. An arbitrary number of freely positionable and re-sizable text frames are allowed per text object.
The text flows continuously from the lowest-numbered frame to the highest-numbered frame with text inside each frame word-wrapped. It flows between frames when a lower-numbered frame cannot fit any more text. If the last frame is reached, text overflows out of it (by default, see options below).
Text Boxes panel.
Add Textbox
Inserts a new frame, just after the current one (in text flow order). The new frame will have the same size and position as the selected one.
Delete X
Delete the current frame.
Overflow
How to handle text overflowing available space in the defined boxes.
Overflow
Just keep text running out of the last box.
Scale to Fit
Scale text to fit into the available space.
Truncate
Hide the end of the text that does not fit into the available space.
Note
It will only truncate in Object Mode, in Edit Mode the whole text remains visible (and overflows as needed).
Size X/Y
Specifies the width and height of the text box, if set to zero no word-wrap happens (it is ignored, and the whole text box system is disabled if all are set to a null size).
Offset X/Y
Controls the X and Y offset of the frame, i.e. its position.
Multiple columns, text flowing between boxes.