简介
UV 编辑器用于将图像/纹理等二维素材映射到三维物体,并编辑所谓的 UV。

带有UV贴图和测试网格纹理的UV编辑器。
UV映射是把二维贴图映射到三维物体最灵活的方法。在此过程中,将三维 (X, Y & Z) 网格展开为二维 (X & Y … 或者也叫做, “U & V”) 图像。图像中的色彩就这样映射到网格上,显示为网格表面的色彩。使用UV贴图可以做出程序化材质和贴图无法做到的真实感,可以做出比顶点绘制更好的细节。
UV 解释
要理解UV映射,最好的类比是裁开纸盒。纸盒是一个三维(3D)物体,就好比场景里的立方体网格。
拿一把剪子沿接缝或褶痕裁开盒子,就可以把它平铺到桌面。俯视桌子上的盒子,把左右方向称之为U,上下方向称之为V。图像就这样变成了二维(2D)。我们用U和V来代替常规的X和Y指代“纹理空间坐标”,后者通常(和Z一起)用来表示三维空间(3D)。
重组盒子之后,UV坐标转换为盒子上的 (X, Y, Z) 坐标。计算机做的其实就是把一张二维图像包裹到一个3D物体表面。
在UV展开过程中,需要在UV编辑器中准确告诉Blender如何将物体的表面映射到一张平摊的二维图像。这一步你可以放手施为。(继续上面的类比,想象一下,把展开的盒子放在桌面,裁成小块,拉伸和/或压缩这些小块,然后就像在桌面上一样已某种方式在图像中进行排列)
举例
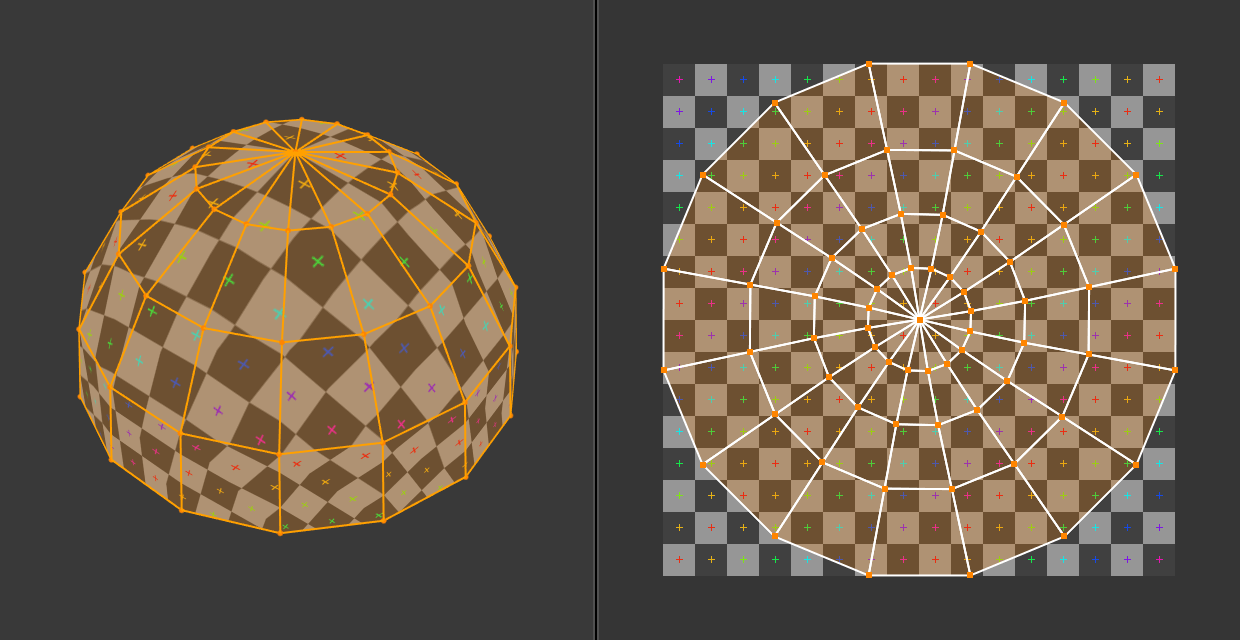
3D空间(XYZ)与UV空间。
在图示中,可以很容易地看出,三维空间中标记面的形状和大小在UV空间中是不同的。这种差异是3D部件(XYZ)在二维平面(即UV贴图)上的“拉伸”(专业上称为贴图)造成的。
如果一个三维物体有一个UV贴图,那么除了三维坐标X、Y和Z之外,物体上的每个点都将有相应的U和V坐标。
Note
在更复杂的模型上(如上图中的球体)会出现一个问题:无法被切割的面,为了让它展开会被拉伸,这虽然有助于制作更简单的UV贴图,但映射在(3D物体)的纹理可能会有变形。
UV的优点
While procedural textures are useful — they never repeat themselves and always “fit” 3D objects — they are not sufficient for more complex or natural objects. For instance, the skin on a human head will never look quite right when procedurally generated. Wrinkles on a human head, or scratches on a car do not occur in random places, but depend on the shape of the model and its usage. Manually-painted images, or images captured from the real world gives more control and realism. For details such as book covers, tapestry, rugs, stains, and detailed props, artists are able to control every pixel on the surface using a UV texture.
UV贴图描述了纹理的哪个部分应附加到模型中的哪个多边形。每个多边形的顶点被分配到二维坐标,该坐标定义图像的哪个部分被映射。这些二维坐标称为UV(将其与三维中的XYZ坐标进行比较)。生成这些UV贴图的操作也称为“展开”,因为它就像是网格展开到二维平面上一样。
For most simple 3D models, Blender has an automatic set of unwrapping algorithms that you can easily apply. For more complex 3D models, regular Cubic, Cylindrical or Spherical mapping, is usually not sufficient. For even and accurate projection, use seams to guide the UV mapping. This can be used to apply textures to arbitrary and complex shapes, like human heads or animals. Often these textures are painted images, created in applications like the Gimp, Krita, or your favorite painting application.
界面
标题栏
UV编辑器标题栏。
标题栏包含几个处理UV的菜单和选项。
同步选择
Keeps UV and mesh part selections in sync.
选择模式
顶点
边
面
Island (Only available if Sync Selection is turned off)
粘性选择模式
When Sync Selection is disabled, these options control how UVs are selected.
视图
用于控制内容在编辑器中的显示方式的工具。见 浏览。
选择
工具 选择UV 。
图像
这包含以下选项 图像编辑器。
UV
Contains tools for Unwrapping Meshes and Editing UVs.
Pivot
Similar to working with pivot points in the 3D Viewport.
UV吸附
Similar to Snapping in the 3D Viewport.
衰减编辑
See Proportional Editing.
活动UV贴图选择器
选择使用的UV贴图。
侧栏区域
图像选项卡
UV顶点
Transform Properties Selecting UVs.
UDIM Grid
Allows you to control the grid size of UDIM tiles.
工具
显示活动工具的设置。
视图
显示
见 显示面板.
2D游标
控制2D游标位置。
Annotations
Options for the annotation tool.