Visualizing Your Mesh
This task shows you how to visualize different aspects of your Istio mesh.
As part of this task, you install the Kiali add-onand use the web-based graphical user interface to view service graphs ofthe mesh and your Istio configuration objects. Lastly, you use the KialiPublic API to generate graph data in the form of consumable JSON.
This task uses the Bookinfo sample application as the example throughout.
Before you begin
The following instructions assume you have installed Helm and use it to install Kiali.To install Kiali without using Helm, follow the Kiali installation instructions.
Create a secret
If you plan on installing Kiali using the Istio demo profile as described in the Istio Quick Start Installation Steps then a default secret will be created for you with a username of admin and passphrase of admin. You can therefore skip this section.
Create a secret in your Istio namespace with the credentials that you use toauthenticate to Kiali.
First, define the credentials you want to use as the Kiali username and passphrase:
$ KIALI_USERNAME=$(read -p 'Kiali Username: ' uval && echo -n $uval | base64)$ KIALI_PASSPHRASE=$(read -sp 'Kiali Passphrase: ' pval && echo -n $pval | base64)
If you are using the Z Shell, zsh, use the following to define the credentials:
$ KIALI_USERNAME=$(read '?Kiali Username: ' uval && echo -n $uval | base64)$ KIALI_PASSPHRASE=$(read -s "?Kiali Passphrase: " pval && echo -n $pval | base64)
To create a secret, run the following commands:
$ NAMESPACE=istio-system$ kubectl create namespace $NAMESPACE
$ cat <<EOF | kubectl apply -f -apiVersion: v1kind: Secretmetadata:name: kialinamespace: $NAMESPACElabels:app: kialitype: Opaquedata:username: $KIALI_USERNAMEpassphrase: $KIALI_PASSPHRASEEOF
Install Via Helm
Once you create the Kiali secret, followthe Helm install instructions to install Kiali via Helm.You must use the —set kiali.enabled=true option when you run the helm command, for example:
$ helm template --set kiali.enabled=true install/kubernetes/helm/istio --name istio --namespace istio-system > $HOME/istio.yaml$ kubectl apply -f $HOME/istio.yaml
This task does not discuss Jaeger and Grafana. Ifyou already installed them in your cluster and you want to see how Kialiintegrates with them, you must pass additional arguments to thehelm command, for example:
$ helm template \--set kiali.enabled=true \--set "kiali.dashboard.jaegerURL=http://jaeger-query:16686" \--set "kiali.dashboard.grafanaURL=http://grafana:3000" \install/kubernetes/helm/istio \--name istio --namespace istio-system > $HOME/istio.yaml$ kubectl apply -f $HOME/istio.yaml
Once you install Istio and Kiali, deploy the Bookinfo sample application.
Running on OpenShift
When Kiali runs on OpenShift it needs access to some OpenShift specific resources in order to function properly,which can be done using the following commands after Kiali has been installed:
$ oc patch clusterrole kiali -p '[{"op":"add", "path":"/rules/-", "value":{"apiGroups":["apps.openshift.io"], "resources":["deploymentconfigs"],"verbs": ["get", "list", "watch"]}}]' --type json$ oc patch clusterrole kiali -p '[{"op":"add", "path":"/rules/-", "value":{"apiGroups":["project.openshift.io"], "resources":["projects"],"verbs": ["get"]}}]' --type json$ oc patch clusterrole kiali -p '[{"op":"add", "path":"/rules/-", "value":{"apiGroups":["route.openshift.io"], "resources":["routes"],"verbs": ["get"]}}]' --type json
Generating a service graph
- To verify the service is running in your cluster, run the following command:
$ kubectl -n istio-system get svc kiali
To determine the Bookinfo URL, follow the instructions to determine the Bookinfo ingress
GATEWAY_URL.To send traffic to the mesh, you have three options
Visit
http://$GATEWAY_URL/productpagein your web browserUse the following command multiple times:
$ curl http://$GATEWAY_URL/productpage
- If you installed the
watchcommand in your system, send requests continually with:
$ watch -n 1 curl -o /dev/null -s -w %{http_code} $GATEWAY_URL/productpage
- To open the Kiali UI, execute the following command in your Kubernetes environment:
$ kubectl -n istio-system port-forward $(kubectl -n istio-system get pod -l app=kiali -o jsonpath='{.items[0].metadata.name}') 20001:20001
Visit https://localhost:20001/kiali/console in your web browser.
To log into the Kiali UI, go to the Kiali login screen and enter the username and passphrase stored in the Kiali secret.
View the overview of your mesh in the Overview page that appears immediately after you log in.The Overview page displays all the namespaces that have services in your mesh.The following screenshot shows a similar page:
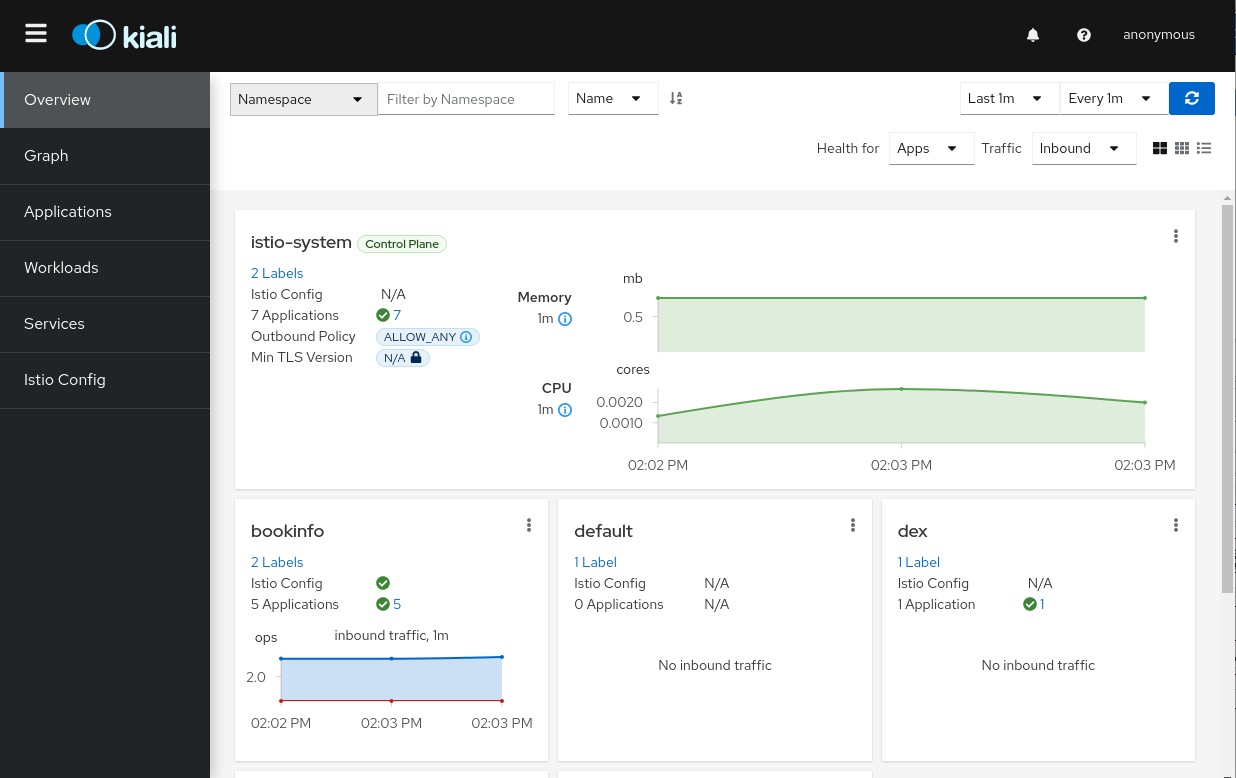 Example Overview
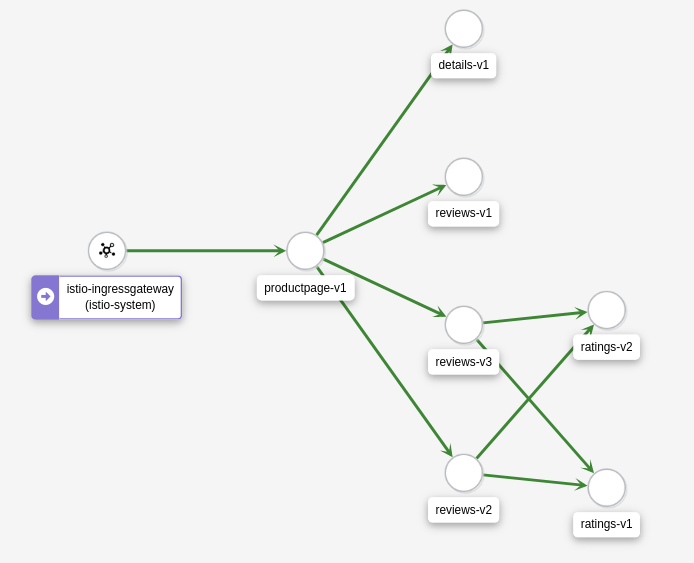
- To view a namespace graph, click on the
bookinfograph icon in the Bookinfo namespace card. The graph icon is in the lower left ofthe namespace card and looks like a connected group of circles.The page looks similar to:
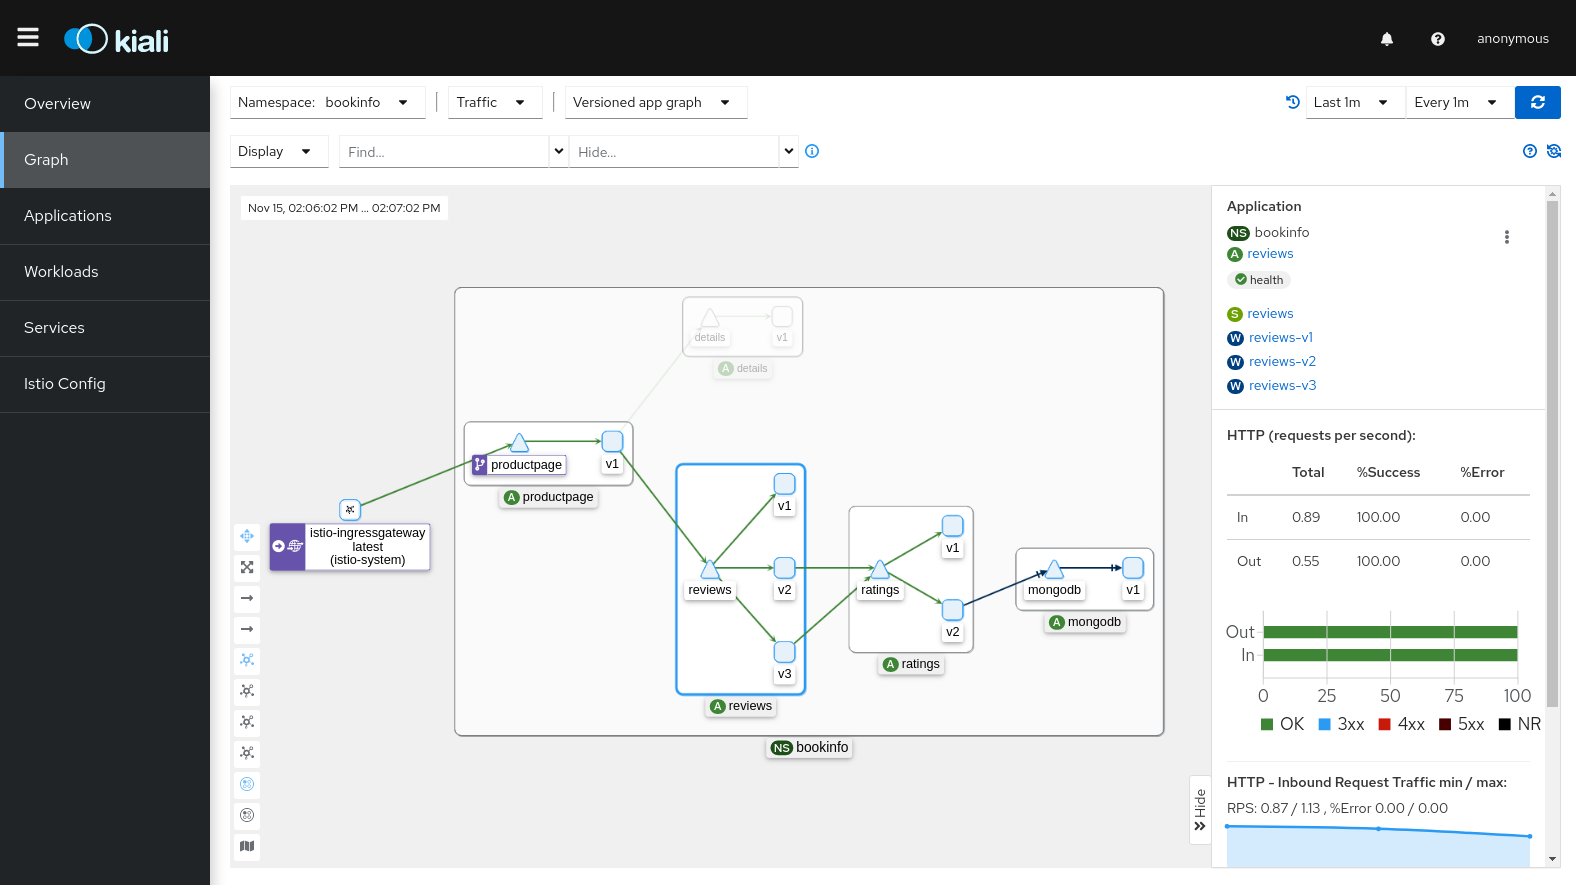 Example Graph
To view a summary of metrics, select any node or edge in the graph to displayits metric details in the summary details panel on the right.
To view your service mesh using different graph types, select a graph typefrom the Graph Type drop down menu. There are several graph typesto choose from: App, Versioned App, Workload, Service.
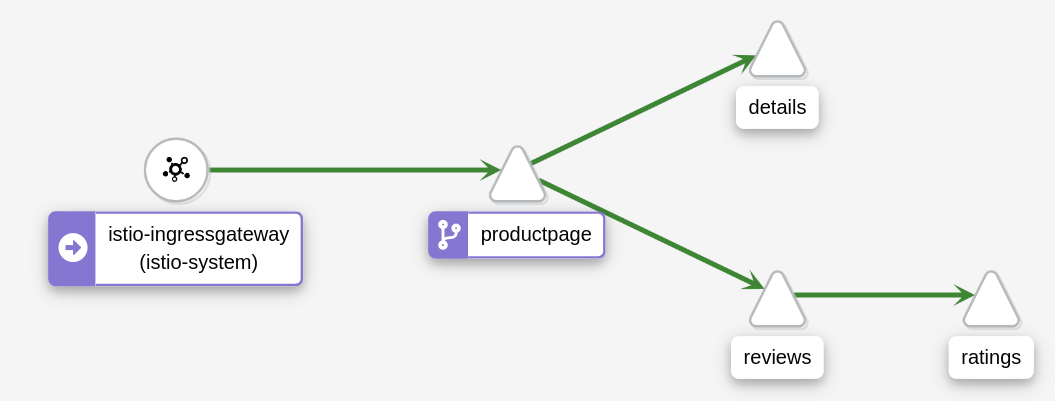
- The App graph type aggregates all versions of an app into a single graph node.The following example shows a single reviews node representing the three versionsof the reviews app.
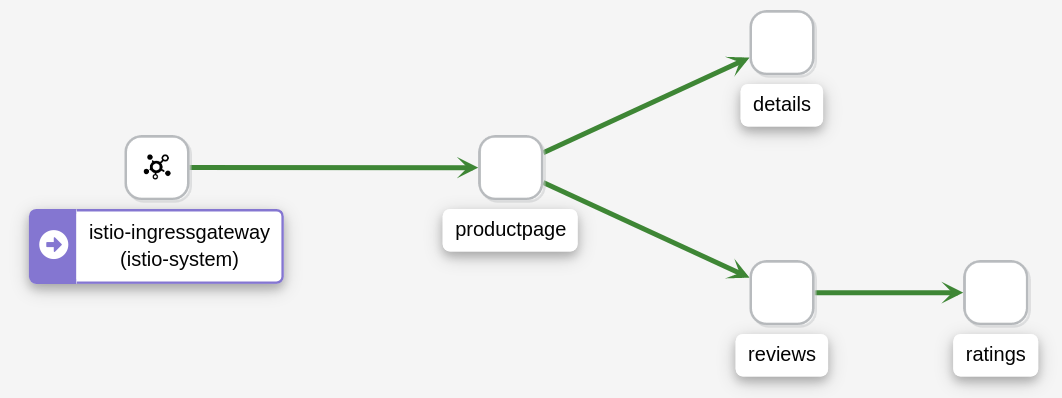 Example App Graph
- The Versioned App graph type shows a node for each version of an app,but all versions of a particular app are grouped together. The following exampleshows the reviews group box that contains the three nodes that represents thethree versions of the reviews app.
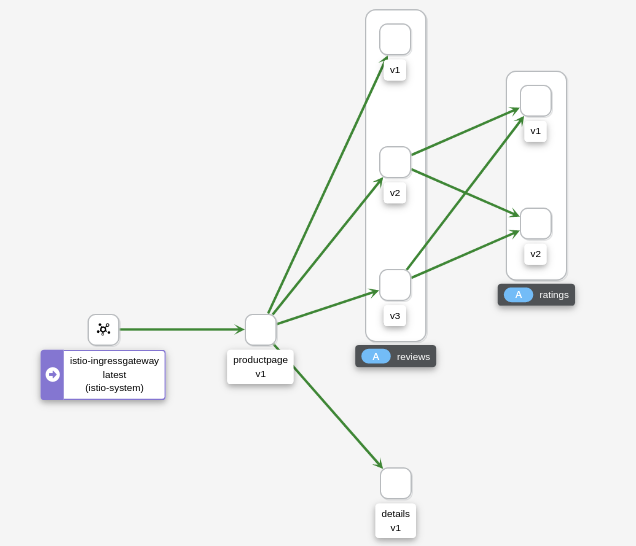 Example Versioned App Graph
- The Workload graph type shows a node for each workload in your service mesh.This graph type does not require you to use the
appandversionlabels so if youopt to not use those labels on your components, this is the graph type you will use.
 Example Workload Graph
- The Service graph type shows a node for each service in your mesh but excludesall apps and workloads from the graph.
 Example Service Graph
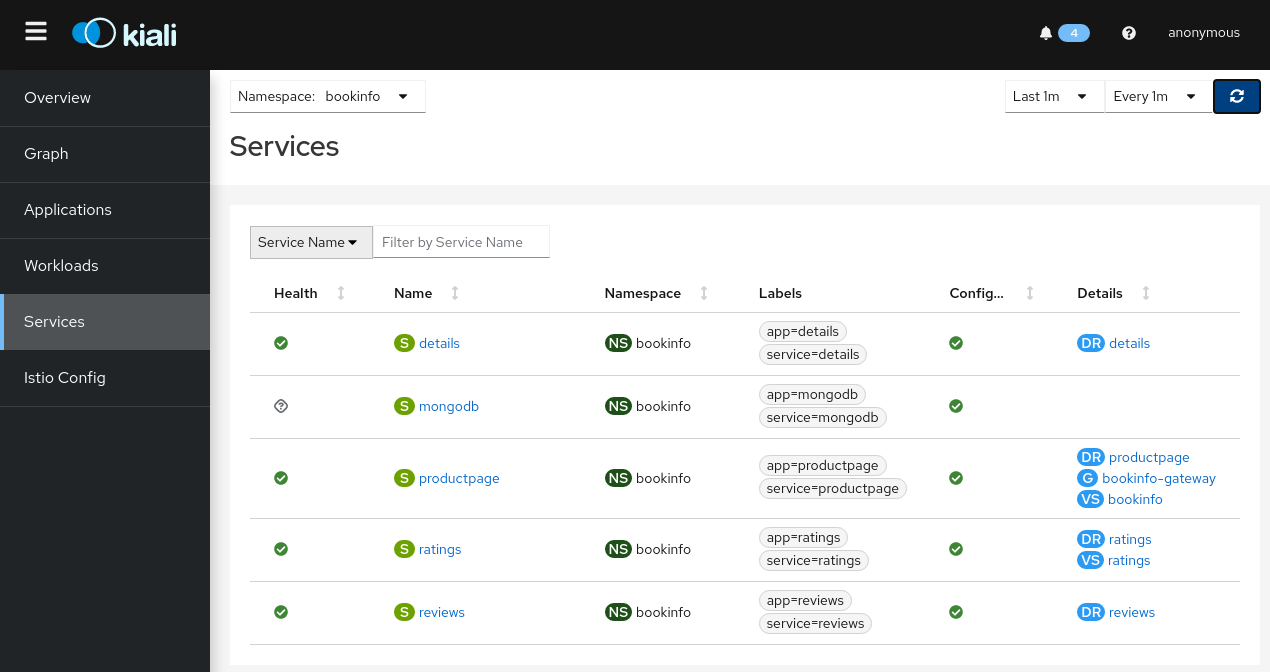
- To examine the details about the Istio configuration, click on theApplications, Workloads, and Services menu icons on the left menubar. The following screenshot shows the Bookinfo applications information:
About the Kiali Public API
To generate JSON files representing the graphs and other metrics, health, andconfiguration information, you can access theKiali Public API.For example, point your browser to $KIALI_URL/api/namespaces/graph?namespaces=bookinfo&graphType=appto get the JSON representation of your graph using the app graph type.
The Kiali Public API is built on top of Prometheus queries and depends on thestandard Istio metric configuration. It also makes Kubernetes API calls toobtain additional details about your services. For the best experience usingKiali, use the metadata labels app and version on your applicationcomponents. As a template, the Bookinfo sample application follows thisconvention.
Cleanup
If you are not planning any follow-up tasks, remove the Bookinfo sample application and Kiali from your cluster.
To remove the Bookinfo application, refer to the Bookinfo cleanup instructions.
To remove Kiali from a Kubernetes environment, remove all components with the
app=kialilabel:
$ kubectl delete all,secrets,sa,configmaps,deployments,ingresses,clusterroles,clusterrolebindings,virtualservices,destinationrules,customresourcedefinitions --selector=app=kiali -n istio-system
相关内容
此任务展示了如何设置和使用 Istio Dashboard 监控网格流量。
Improving availability and reducing latency.
Provides an overview of Mixer's plug-in architecture.
This task shows you how to configure Istio to collect and customize metrics.
了解如何配置代理以向 Jaeger 发送追踪请求。
How to configure the proxies to send tracing requests to LightStep.