Angular UI v2.9 迁移到 v3.0 指南
在v3.0改变了什么?
Angular 10
新的ABP Angular UI基于Angular 10和TypeScript 3.9,我们已经放弃了对Angular 8的支持. 不过ABP模块将继续与Angular 9兼容使用. 因此如果你的项目是Angular 9,则无需更新为 Angular10. 更新通常很容易.
如何迁移?
在你的根文件夹中打开一个终端,然后运行以下命令:
yarn ng update @angular/cli @angular/core --force
这会做如下修改:
- 更新你的package.json并安装新的软件包
- 修改tsconfig.json文件创建一个”Solution Style”配置
- 重命名
browserslist为.browserslistrc
另一方面,如果你单独使用 yarn ng update 命令检查首先要更新哪些包会更好. Angular会给你一个要更新的包列表.
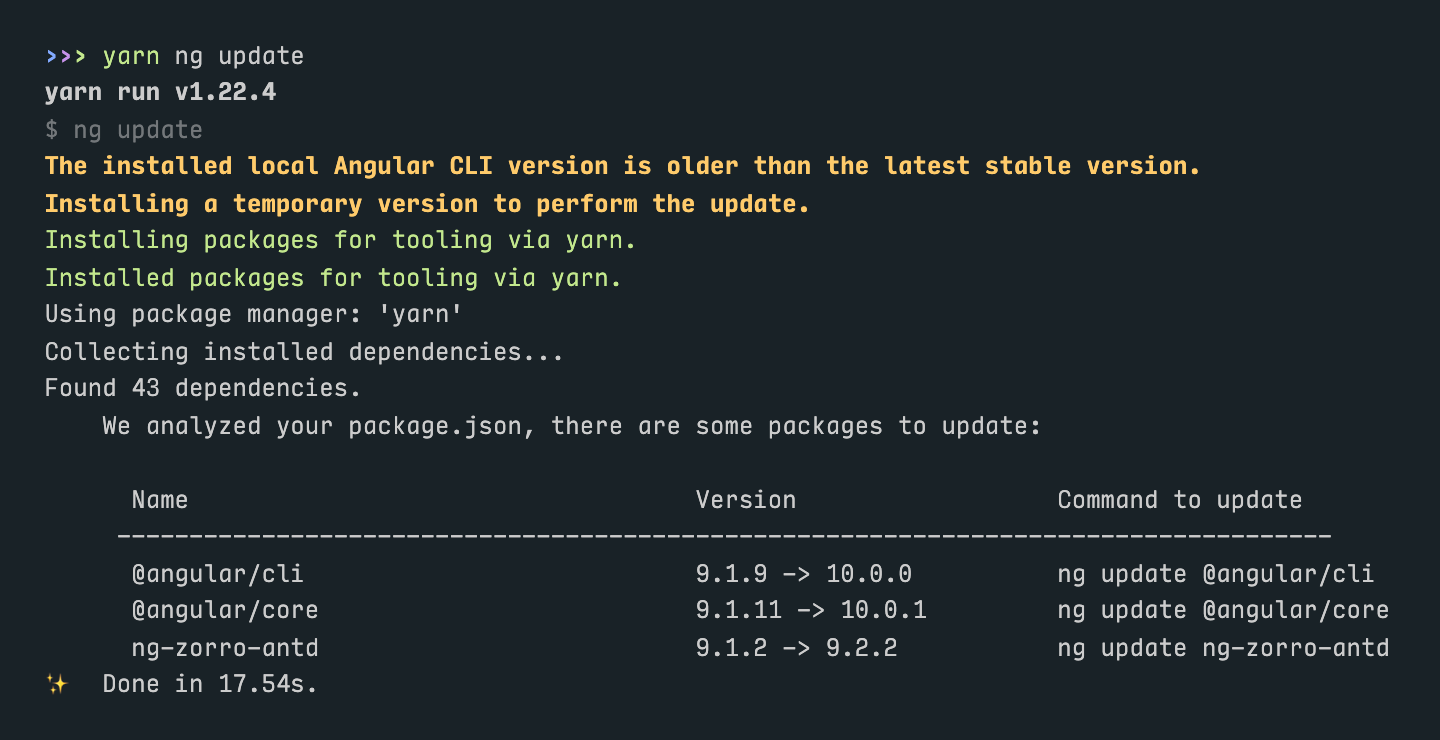
当Angular报告上面的包后,运行命令:
yarn ng update @angular/cli @angular/core ng-zorro-antd --force
如果Angular提示你的仓库有中未提交的更改,可以提交/存储它,也可以在命令中添加
--allow-dirty参数.
配置模块
在ABP v2.x中,每个延迟加载的模块都有一个可通过单独的程序包使用的配置模块,模块配置如下:
import { AccountConfigModule } from '@abp/ng.account.config';@NgModule({imports: [// other importsAccountConfigModule.forRoot({ redirectUrl: '/' }),],// providers, declarations, and bootstrap})export class AppModule {}
…在app-routing.module.ts…
const routes: Routes = [// other route configuration{path: 'account',loadChildren: () => import('./lazy-libs/account-wrapper.module').then(m => m.AccountWrapperModule),},];
虽然有效,但有一些缺点:
- 每个模块都有两个独立的程序包,但实际上这些程序包是相互依赖的.
- 配置延迟加载的模块需要包装模块.
- ABP Commercial具有可扩展性系统,在根模块上配置可扩展模块会增加 bundle 的大小.
在ABP v3.0中,我们为每个配置模块引入了辅助入口点,并且提供了一种在没有包装的情况下配置延迟加载的模块的新方法. 现在模块配置如下所示:
import { AccountConfigModule } from '@abp/ng.account/config';@NgModule({imports: [// other importsAccountConfigModule.forRoot(),],// providers, declarations, and bootstrap})export class AppModule {}
… 在app-routing.module.ts…
const routes: Routes = [// other route configuration{path: 'account',loadChildren: () => import('@abp/ng.account').then(m => m.AccountModule.forLazy({ redirectUrl: '/' })),},];
这项更改帮助我们减少了捆绑包的大小并大大缩短了构建时间. 我们相信你会注意到你的应用程序有所不同.
一个更好的例子
AppModule:
import { AccountConfigModule } from '@abp/ng.account/config';import { CoreModule } from '@abp/ng.core';import { IdentityConfigModule } from '@abp/ng.identity/config';import { SettingManagementConfigModule } from '@abp/ng.setting-management/config';import { TenantManagementConfigModule } from '@abp/ng.tenant-management/config';import { ThemeBasicModule } from '@abp/ng.theme.basic';import { ThemeSharedModule } from '@abp/ng.theme.shared';import { NgModule } from '@angular/core';import { BrowserModule } from '@angular/platform-browser';import { BrowserAnimationsModule } from '@angular/platform-browser/animations';import { NgxsModule } from '@ngxs/store';import { environment } from '../environments/environment';import { AppRoutingModule } from './app-routing.module';@NgModule({imports: [BrowserModule,BrowserAnimationsModule,AppRoutingModule,CoreModule.forRoot({environment,sendNullsAsQueryParam: false,skipGetAppConfiguration: false,}),ThemeSharedModule.forRoot(),AccountConfigModule.forRoot(),IdentityConfigModule.forRoot(),TenantManagementConfigModule.forRoot(),SettingManagementConfigModule.forRoot(),ThemeBasicModule.forRoot(),NgxsModule.forRoot(),],// providers, declarations, and bootstrap})export class AppModule {}
AppRoutingModule:
import { NgModule } from '@angular/core';import { RouterModule, Routes } from '@angular/router';const routes: Routes = [{path: '',pathMatch: 'full',loadChildren: () => import('./home/home.module').then(m => m.HomeModule),},{path: 'account',loadChildren: () =>import('@abp/ng.account').then(m => m.AccountModule.forLazy({ redirectUrl: '/' })),},{path: 'identity',loadChildren: () => import('@abp/ng.identity').then(m => m.IdentityModule.forLazy()),},{path: 'tenant-management',loadChildren: () =>import('@abp/ng.tenant-management').then(m => m.TenantManagementModule.forLazy()),},{path: 'setting-management',loadChildren: () =>import('@abp/ng.setting-management').then(m => m.SettingManagementModule.forLazy()),},];@NgModule({imports: [RouterModule.forRoot(routes)],exports: [RouterModule],})export class AppRoutingModule {}
你可能已经注意到我们在AppComponent模板中使用了
<abp-dynamic-layout>而不是<router-outlet>. 我们这样做是为了避免不必要的渲染和闪烁. 这不是强制的,但是我们建议在你的应用程序路由中做同样的事情.
如何迁移?
- 使用
yarn remove删除你的项目的配置包. - 从辅助入口点(例如
@abp/ng.identity/config)导入配置模块. - 调用所有新配置模块的静态
forRoot方法,即使配置没有被传递. - 调用
ThemeBasicModule的静态forRoot方法(或商业上的ThemeLeptonModule),并从导入中删除SharedModule(除非已在其中添加了根模块所需的任何内容). - 在app路由模块中直接导入延迟ABP模块 (如
() => import('@abp/ng.identity').then(...)). - 在所有延迟模块
then中调用的静态forLazy方法,即使配置没有被传递. - [可选]添加
<abp-dynamic-layout></abp-dynamic-layout>到AppComponent模板并且删除<router-outlet></router-outlet>,获得更好的性能和UX.
RoutesService
在ABP v2.x中,通过以下两种方式之一将路由添加到菜单:
从v3.0开始,我们更改了添加和修改路由的方式. 我们不再将路由存储在 ConfigState中(破坏性更改). 而是有一个名为 RoutesService 的新服务,该服务用于添加,修补或删除菜单项. 详情请查看文档.
如何迁移?
- 检查你是否曾经使用
ConfigState或ConfigStateService添加路由. 请用RoutesService的add方法替换它们. - 检查你是否曾经修补的路由. 将其替换为
RoutesService的patch方法. - 仔细检查你是否使用绝对路径,并在
add或patch方法调用中为子菜单项提供parentName而不是children属性.
NavItemsService
在ABP v2.x中,通过LayoutStateService添加导航元素.
从v3.0开始,我们改变了添加和修改导航项的方式,以前的方法不再可用(破坏性更改). 详情请查看文档.
如何迁移?
- 用
NavItemsService的addItems方法替换所有dispatchAddNavigationElement调用.
ngx-datatable
在v3之前,我们一直使用自定义组件 abp-table 作为默认表. 但是数据表是复杂的组件,要实现功能齐全的数据表需要大量的精力,我们计划将其引入其他功能.
从ABP v3开始,我们已切换到经过严格测试,执行良好的数据表格:ngx-datatable. 所有的ABP模块都已经实现了ngx-datatable. ThemeSharedModule 已经导出了 NgxDatatableModule. 因此如果你在终端运行 yarn add @swimlane/ngx-datatable 来安装这个包,它将在你的应用的所有模块中可用.
为了正确设置样式,你需要在angular.json文件的样式部分中添加以下内容(在其他所有元素之上):
"styles": [{"input": "node_modules/@swimlane/ngx-datatable/index.css","inject": true,"bundleName": "ngx-datatable-index"},{"input": "node_modules/@swimlane/ngx-datatable/assets/icons.css","inject": true,"bundleName": "ngx-datatable-icons"},{"input": "node_modules/@swimlane/ngx-datatable/themes/material.css","inject": true,"bundleName": "ngx-datatable-material"},// other styles]
由于尚未删除 abp-table, 因此以前由ABP v2.x构建的模块不会突然丢失所有. 但是它们的外观与内置ABP v3模块有所不同, 因此你可能希望将这些模块中的表转换为ngx-datatable. 为了减少将abp-table转换为ngx-datatable所需的工作量,我们修改了 ListService 以使其与 ngx-datatable 一起很好地工作,并引入了两个新指令: NgxDatatableListDirective 和 NgxDatatableDefaultDirective.
这些指令的用法很简单:
@Component({providers: [ListService],})export class SomeComponent {data$ = this.list.hookToQuery(query => this.dataService.get(query));constructor(public readonly list: ListService,public readonly dataService: SomeDataService,) {}}
…在组件模板…
<ngx-datatable[rows]="(data$ | async)?.items || []"[count]="(data$ | async)?.totalCount || 0"[list]="list"default><!-- column templates here --></ngx-datatable>
通过 NgxDatatableListDirective 绑定注入的 ListService 实例后,你不再需要担心分页或排序. 同样 NgxDatatableDefaultDirective 去除了几个属性绑定,以使ngx-datatable适合我们的样式.
一个更好的例子
<ngx-datatable[rows]="items"[count]="count"[list]="list"default><!-- the grid actions column --><ngx-datatable-columnname=""[maxWidth]="150"[width]="150"[sortable]="false"><ng-templatengx-datatable-cell-templatelet-row="row"let-i="rowIndex"><abp-grid-actions[index]="i"[record]="row"text="AbpUi::Actions"></abp-grid-actions></ng-template></ngx-datatable-column><!-- a basic column --><ngx-datatable-columnprop="someProp"[name]="'::SomeProp' | abpLocalization"[width]="200"></ngx-datatable-column><!-- a column with a custom template --><ngx-datatable-columnprop="someOtherProp"[name]="'::SomeOtherProp' | abpLocalization"[width]="250"><ng-templatengx-datatable-cell-templatelet-row="row"let-i="index"><div abpEllipsis>{{ row.someOtherProp }}</div></ng-template></ngx-datatable-column></ngx-datatable>
如何迁移?
- 安装
@swimlane/ngx-datatable包. - 添加ngx-datatable样式到angular.json文件.
- 如果可以的话,根据上面的例子更新你的模.
- 如果你稍后需要这样做,并且打算保留abp-table一段时间,请确保根据此处描述的破坏性更改更新分页.
**重要说明:**abp-table没有被删除,但已被弃用并在以后的版本中删除. 请考虑切换到ngx-datatable.
扩展系统[商业版]
扩展程序系统现在是开源的, 可以从 @abp/ng.theme.shared/extensions 而不是从 @volo/abp.commercial.ng.ui 中获取. 同样,根据config软件包的新结构,如上所述通过 forLazy 静态方法进行配置.
如何迁移?
如果你以前从未使用过扩展系统,则无需执行任何操作. 否则请再次检查文档以查看更改. 扩展系统本身的工作原理与以前相同,唯一的变化是你从中导入的包,静态方法以及您将贡献者传递给的模块.
Lepton 主题Logo [商业版]
在ABP v2.x中,Lepton每个颜色主题都有一个亮徽标和一个暗徽标. 我们意识到我们可以使它仅使用一个浅色和一个深色徽标. 因此我们更改了Lepton查找徽标图像的方式,现在你只需要在项目中包含 logo-light.png 和 logo-dark.png.
如何迁移?
如果你之前已切换模板徽标PNG,则更改很简单:
- 转到
/assets/images/logo目录. - 重命名
theme1.png为logo-light.png并且重命名theme1-reverse.png为logo-dark.png. - 删除所有其他
theme*.png文件.
如果你更换了徽标组件,则更改有些不同,但仍然很简单. LayoutStateService 有两个新成员: primaryLogoColor 和 secondaryLogoColor. 它们有 'light' 和 'dark' 设置值做为可观察流. 你可以使用 async 管道在自定义徽标组件模板中使用它们的值. 这是一个完整的示例,其中涵盖了主要和辅助(帐户)布局徽标.
import { AddReplaceableComponent } from '@abp/ng.core';import { CommonModule } from '@angular/common';import { APP_INITIALIZER, Component, Injector, NgModule } from '@angular/core';import { Store } from '@ngxs/store';import { eAccountComponents } from '@volo/abp.ng.account';import {AccountLayoutComponent,eThemeLeptonComponents,LayoutStateService,} from '@volo/abp.ng.theme.lepton';import { Observable } from 'rxjs';import { map } from 'rxjs/operators';@Component({template: `<div class="account-brand p-4 text-center mb-1" *ngIf="isAccount; else link"><ng-template [ngTemplateOutlet]="link"></ng-template></div><ng-template #link><a [style.background-image]="logoUrl | async" class="navbar-brand" routerLink="/"></a></ng-template>`,})export class LogoComponent {isAccount: boolean;logoColor: Observable<'dark' | 'light'>;get logoUrl() {return this.logoColor.pipe(map(color => `url(/assets/images/logo/logo-${color}.png)`));}constructor(injector: Injector) {const layout = injector.get(LayoutStateService);this.isAccount = Boolean(injector.get(AccountLayoutComponent, false));this.logoColor = this.isAccount ? layout.secondaryLogoColor : layout.primaryLogoColor;}}@NgModule({imports: [CommonModule],declarations: [LogoComponent],exports: [LogoComponent],})export class LogoModule {}export const APP_LOGO_PROVIDER = [{ provide: APP_INITIALIZER, useFactory: switchLogos, multi: true, deps: [Store] },];export function switchLogos(store: Store) {return () => {store.dispatch(new AddReplaceableComponent({component: LogoComponent,key: eThemeLeptonComponents.Logo,}),);store.dispatch(new AddReplaceableComponent({component: LogoComponent,key: eAccountComponents.Logo,}),);};}
只要将 APP_LOGO_PROVIDER 添加到根模块的提供程序(通常是 AppModule ),你就会有一个调整主题颜色的自定义徽标组件.
过时的接口
某些接口早已被标记为已弃用,现在已将其删除.
如何迁移?
请检查你是否仍在使用Issue中列出的任何内容.