Getting Started with Istio and Kubernetes Gateway API
Istio includes beta support for the Kubernetes Gateway API and intends to make it the default API for traffic management in the future. The following instructions allow you to get started with Istio using the Gateway API. If you prefer to use the tried-and-proven Istio APIs for traffic management, you should use these instructions instead.
The Kubernetes Gateway API CRDs do not come installed by default on most Kubernetes clusters, so make sure they are installed before using the Gateway API:
$ kubectl get crd gateways.gateway.networking.k8s.io &> /dev/null || \{ kubectl kustomize "github.com/kubernetes-sigs/gateway-api/config/crd?ref=v0.8.0" | kubectl apply -f -; }
This guide lets you quickly evaluate Istio. If you are already familiar with Istio or interested in installing other configuration profiles or advanced deployment models, refer to our which Istio installation method should I use? FAQ page.
These steps require you to have a cluster running a supported version of Kubernetes (1.25, 1.26, 1.27, 1.28). You can use any supported platform, for example Minikube or others specified by the platform-specific setup instructions.
Follow these steps to get started with Istio:
- Download and install Istio
- Deploy the sample application
- Open the application to outside traffic
- View the dashboard
Download Istio
Go to the Istio release page to download the installation file for your OS, or download and extract the latest release automatically (Linux or macOS):
$ curl -L https://istio.io/downloadIstio | sh -
The command above downloads the latest release (numerically) of Istio. You can pass variables on the command line to download a specific version or to override the processor architecture. For example, to download Istio 1.19.4 for the x86_64 architecture, run:
$ curl -L https://istio.io/downloadIstio | ISTIO_VERSION=1.19.4 TARGET_ARCH=x86_64 sh -
Move to the Istio package directory. For example, if the package is
istio-1.19.4:$ cd istio-1.19.4
The installation directory contains:
- Sample applications in
samples/ - The istioctl client binary in the
bin/directory.
Add the
istioctlclient to your path (Linux or macOS):$ export PATH=$PWD/bin:$PATH
Install Istio
For this installation, we use the
democonfiguration profile. It’s selected to have a good set of defaults for testing, but there are other profiles for production or performance testing.If your platform has a vendor-specific configuration profile, e.g., Openshift, use it in the following command, instead of the
demoprofile. Refer to your platform instructions for details.Unlike Istio Gateways, creating Kubernetes Gateways will, by default, also deploy associated gateway proxy services. Therefore, because they won’t be used, we disable the deployment of the default Istio gateway services that are normally installed as part of the
demoprofile.$ istioctl install -f @samples/bookinfo/demo-profile-no-gateways.yaml@ -y✔ Istio core installed✔ Istiod installed✔ Installation complete
Add a namespace label to instruct Istio to automatically inject Envoy sidecar proxies when you deploy your application later:
$ kubectl label namespace default istio-injection=enablednamespace/default labeled
Deploy the sample application
Deploy the Bookinfo sample application:
$ kubectl apply -f @samples/bookinfo/platform/kube/bookinfo.yaml@service/details createdserviceaccount/bookinfo-details createddeployment.apps/details-v1 createdservice/ratings createdserviceaccount/bookinfo-ratings createddeployment.apps/ratings-v1 createdservice/reviews createdserviceaccount/bookinfo-reviews createddeployment.apps/reviews-v1 createddeployment.apps/reviews-v2 createddeployment.apps/reviews-v3 createdservice/productpage createdserviceaccount/bookinfo-productpage createddeployment.apps/productpage-v1 created
The application will start. As each pod becomes ready, the Istio sidecar will be deployed along with it.
$ kubectl get servicesNAME TYPE CLUSTER-IP EXTERNAL-IP PORT(S) AGEdetails ClusterIP 10.0.0.212 <none> 9080/TCP 29skubernetes ClusterIP 10.0.0.1 <none> 443/TCP 25mproductpage ClusterIP 10.0.0.57 <none> 9080/TCP 28sratings ClusterIP 10.0.0.33 <none> 9080/TCP 29sreviews ClusterIP 10.0.0.28 <none> 9080/TCP 29s
and
$ kubectl get podsNAME READY STATUS RESTARTS AGEdetails-v1-558b8b4b76-2llld 2/2 Running 0 2m41sproductpage-v1-6987489c74-lpkgl 2/2 Running 0 2m40sratings-v1-7dc98c7588-vzftc 2/2 Running 0 2m41sreviews-v1-7f99cc4496-gdxfn 2/2 Running 0 2m41sreviews-v2-7d79d5bd5d-8zzqd 2/2 Running 0 2m41sreviews-v3-7dbcdcbc56-m8dph 2/2 Running 0 2m41s
Re-run the previous command and wait until all pods report READY
2/2and STATUSRunningbefore you go to the next step. This might take a few minutes depending on your platform.Verify everything is working correctly up to this point. Run this command to see if the app is running inside the cluster and serving HTML pages by checking for the page title in the response:
$ kubectl exec "$(kubectl get pod -l app=ratings -o jsonpath='{.items[0].metadata.name}')" -c ratings -- curl -sS productpage:9080/productpage | grep -o "<title>.*</title>"<title>Simple Bookstore App</title>
Open the application to outside traffic
The Bookinfo application is deployed but not accessible from the outside. To make it accessible, you need to create an ingress gateway, which maps a path to a route at the edge of your mesh.
Create a Kubernetes Gateway for the Bookinfo application:
$ kubectl apply -f @samples/bookinfo/gateway-api/bookinfo-gateway.yaml@gateway.gateway.networking.k8s.io/bookinfo-gateway createdhttproute.gateway.networking.k8s.io/bookinfo created
Because creating a Kubernetes
Gatewayresource will also deploy an associated proxy service, run the following command to wait for the gateway to be ready:$ kubectl wait --for=condition=programmed gtw bookinfo-gateway
Ensure that there are no issues with the configuration:
$ istioctl analyze✔ No validation issues found when analyzing namespace: default.
Determining the ingress IP and ports
Set the
INGRESS_HOSTandINGRESS_PORTvariables for accessing the gateway:These instructions assume that your Kubernetes cluster supports external load balancers (i.e., Services of type
LoadBalancer). Refer to ingress control for details.$ export INGRESS_HOST=$(kubectl get gtw bookinfo-gateway -o jsonpath='{.status.addresses[0].value}')$ export INGRESS_PORT=$(kubectl get gtw bookinfo-gateway -o jsonpath='{.spec.listeners[?(@.name=="http")].port}')
Set
GATEWAY_URL:$ export GATEWAY_URL=$INGRESS_HOST:$INGRESS_PORT
Ensure an IP address and port were successfully assigned to the environment variable:
$ echo "$GATEWAY_URL"169.48.8.37:80
Verify external access
Confirm that the Bookinfo application is accessible from outside the cluster by viewing the Bookinfo product page using a browser.
Run the following command to retrieve the external address of the Bookinfo application.
$ echo "http://$GATEWAY_URL/productpage"
Paste the output from the previous command into your web browser and confirm that the Bookinfo product page is displayed.
View the dashboard
Istio integrates with several different telemetry applications. These can help you gain an understanding of the structure of your service mesh, display the topology of the mesh, and analyze the health of your mesh.
Use the following instructions to deploy the Kiali dashboard, along with Prometheus, Grafana, and Jaeger.
Install Kiali and the other addons and wait for them to be deployed.
$ kubectl apply -f samples/addons$ kubectl rollout status deployment/kiali -n istio-systemWaiting for deployment "kiali" rollout to finish: 0 of 1 updated replicas are available...deployment "kiali" successfully rolled out
If there are errors trying to install the addons, try running the command again. There may be some timing issues which will be resolved when the command is run again.
Access the Kiali dashboard.
$ istioctl dashboard kiali
In the left navigation menu, select Graph and in the Namespace drop down, select default.
To see trace data, you must send requests to your service. The number of requests depends on Istio’s sampling rate and can be configured using the Telemetry API. With the default sampling rate of 1%, you need to send at least 100 requests before the first trace is visible. To send a 100 requests to the
productpageservice, use the following command:$ for i in $(seq 1 100); do curl -s -o /dev/null "http://$GATEWAY_URL/productpage"; done
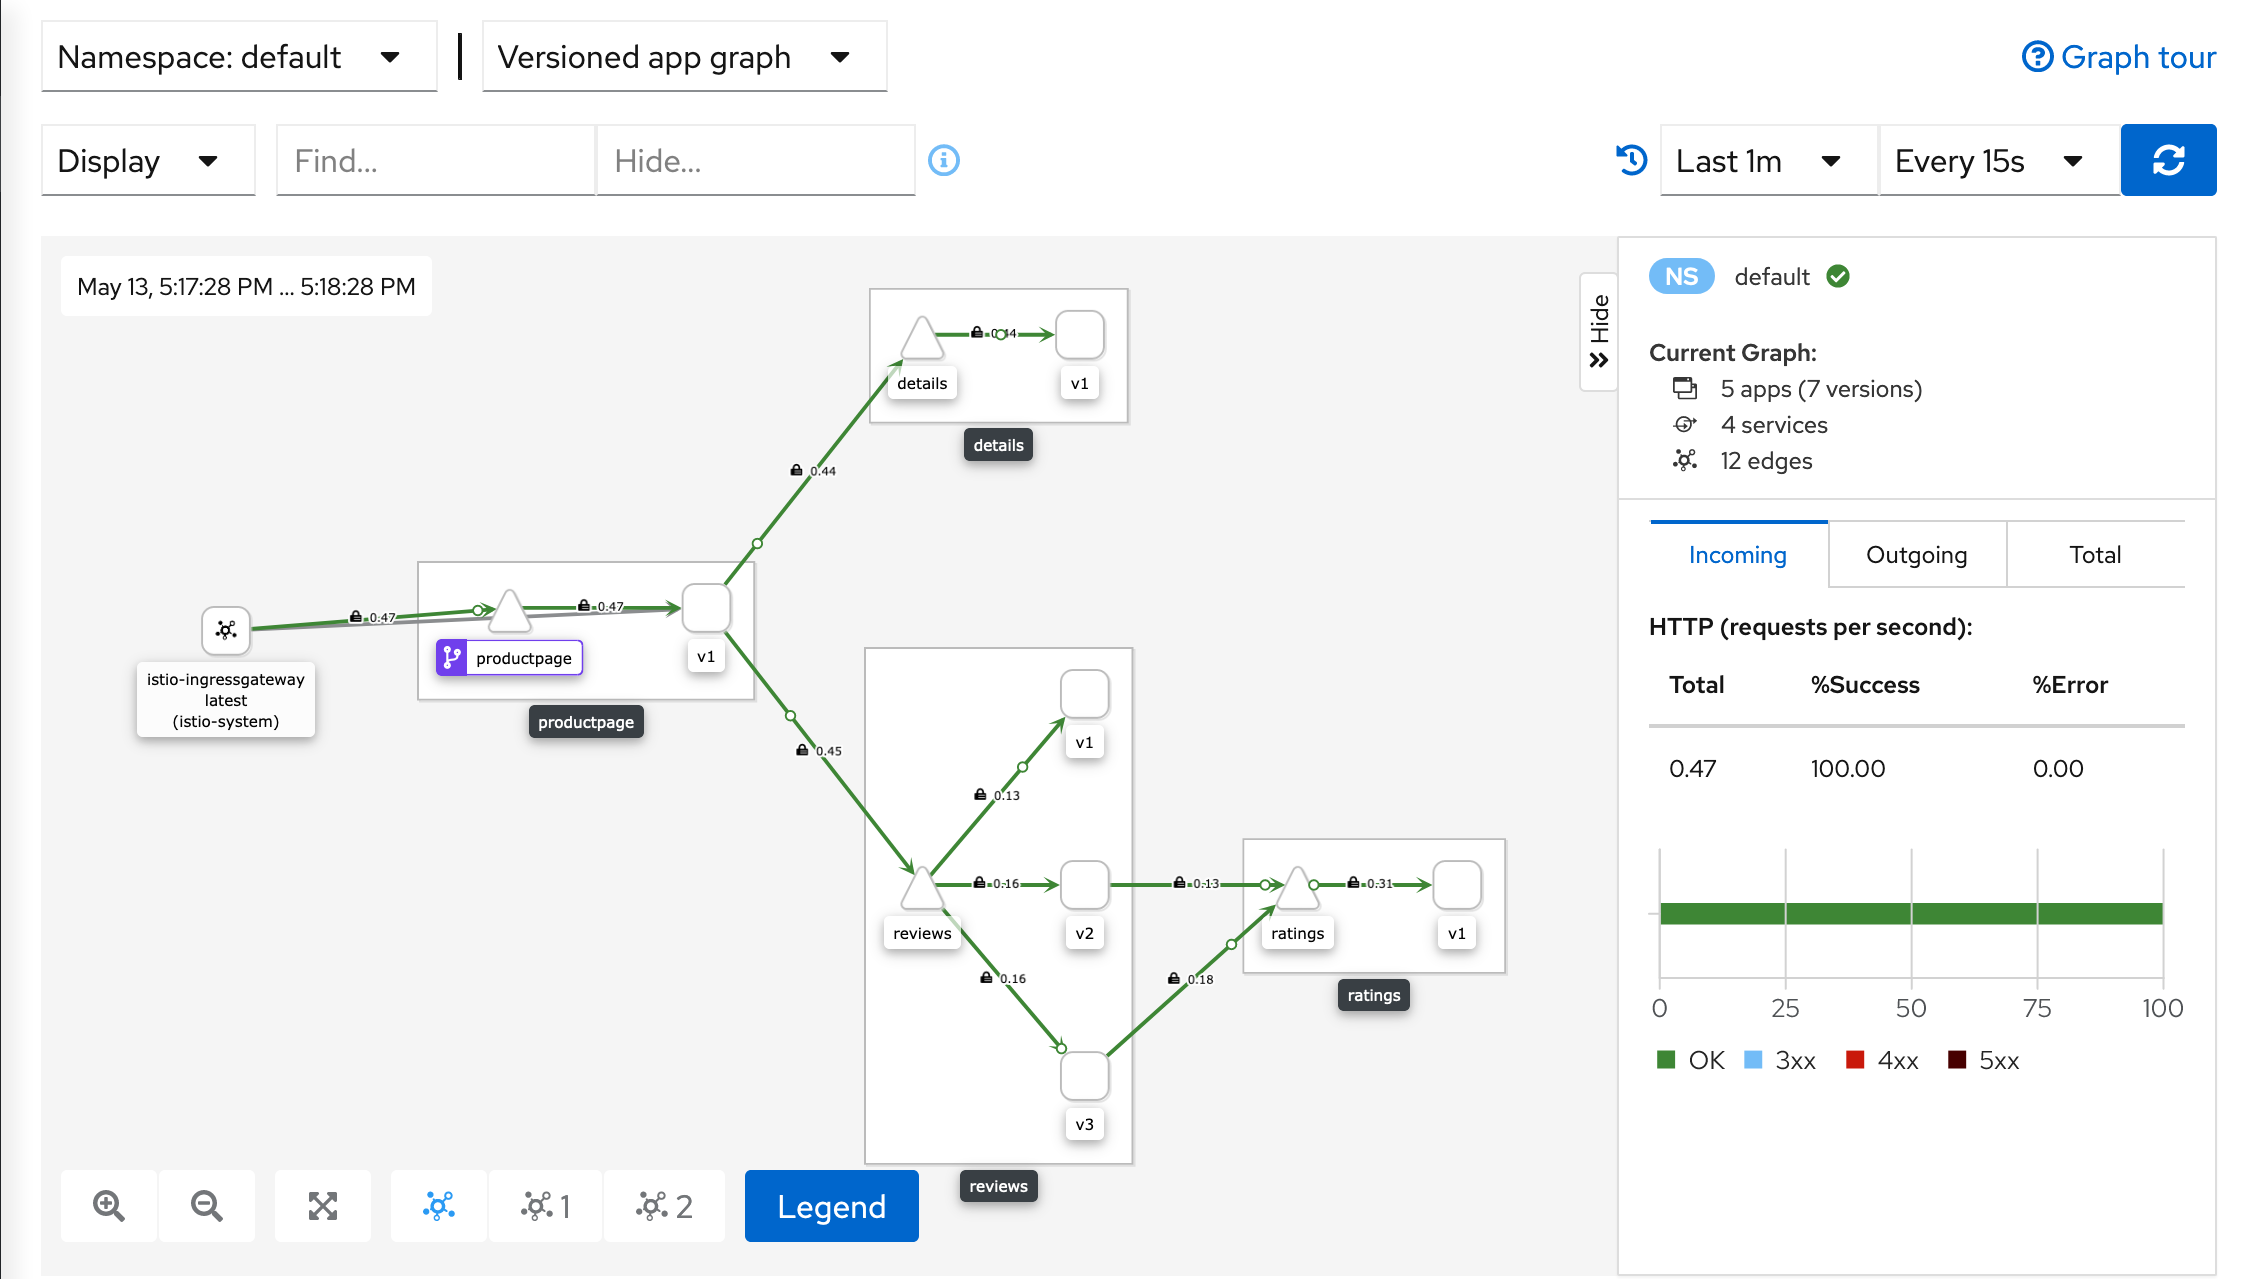
The Kiali dashboard shows an overview of your mesh with the relationships between the services in the
Bookinfosample application. It also provides filters to visualize the traffic flow.
Kiali Dashboard
Next steps
Congratulations on completing the evaluation installation!
These tasks are a great place for beginners to further evaluate Istio’s features using this demo installation:
- Request routing
- Fault injection
- Traffic shifting
- Querying metrics
- Visualizing metrics
- Accessing external services
- Visualizing your mesh
Before you customize Istio for production use, see these resources:
Join the Istio community
We welcome you to ask questions and give us feedback by joining the Istio community.
Uninstall
To delete the Bookinfo sample application and its configuration, see Bookinfo cleanup.
The Istio uninstall deletes the RBAC permissions and all resources hierarchically under the istio-system namespace. It is safe to ignore errors for non-existent resources because they may have been deleted hierarchically.
$ kubectl delete -f @samples/addons@$ istioctl uninstall -y --purge
The istio-system namespace is not removed by default. If no longer needed, use the following command to remove it:
$ kubectl delete namespace istio-system
The label to instruct Istio to automatically inject Envoy sidecar proxies is not removed by default. If no longer needed, use the following command to remove it:
$ kubectl label namespace default istio-injection-