从 computed 说起
为了弄懂 Watcher 我们需要选择一个切入点,这次我们选择从 computed 为切入点来讲解。这个是大家非常常用的功能,而且他能比较好的解释我们是如何检测到状态变化并获取最新值的。我们先假设我们有如下组件:
export default {data () {return {msg: 'Welcome to Your Vue.js App'}},computed: {upperMsg () {return this.msg.toUpperCase()}}}
我们有 data.msg 和 computed.upperMsg 两个自定义的数据。显然,upperMsg 依赖于 msg,当msg 更新的时候,upperMsg 也会更新。根据上一章的讲解,我们知道通过 Observer 我们可以监控 msg 的读写,那么如何和 upperMsg 关联起来呢?

Watcher 就是把这两者连接起来的关键,我们来看看 initWatcher 的代码如何工作的。完整代码如下:
core/observer/watcher.js
function initComputed (vm, computed) {// $flow-disable-linevar watchers = vm._computedWatchers = Object.create(null);// computed properties are just getters during SSRvar isSSR = isServerRendering();for (var key in computed) {var userDef = computed[key];var getter = typeof userDef === 'function' ? userDef : userDef.get;if (process.env.NODE_ENV !== 'production' && getter == null) {warn(("Getter is missing for computed property \"" + key + "\"."),vm);}if (!isSSR) {// create internal watcher for the computed property.watchers[key] = new Watcher(vm,getter || noop,noop,computedWatcherOptions);}// component-defined computed properties are already defined on the// component prototype. We only need to define computed properties defined// at instantiation here.if (!(key in vm)) {defineComputed(vm, key, userDef);} else if (process.env.NODE_ENV !== 'production') {if (key in vm.$data) {warn(("The computed property \"" + key + "\" is already defined in data."), vm);} else if (vm.$options.props && key in vm.$options.props) {warn(("The computed property \"" + key + "\" is already defined as a prop."), vm);}}}}
为了方便起见,我们把在开发环境下的一些友好警告删除,并删除一些不影响我们逻辑的代码,再看看代码:
我们一行一行的来看代码,为了方便起见,我们把在开发环境下的一些友好警告跳过,也跳过一些不影响我们逻辑和理解代码意思的几行。
首先是开头两行代码:
var watchers = vm._computedWatchers = Object.create(null);var isSSR = isServerRendering();
这两行代码定义了两个变量,watchers 是空的对象,显然是用来存储接下来创建的 watchers ,isSSR 表示是否是服务器端渲染,因为如果是在服务器端渲染,就没有必要进行监听了,我们暂且不考虑服务器端的内容。
接下来是一个 for 循环,会遍历 computed对象,循环体的第一段代码如下:
var userDef = computed[key];var getter = typeof userDef === 'function' ? userDef : userDef.get;if (!isSSR) {// create internal watcher for the computed property.watchers[key] = new Watcher(vm,getter || noop,noop,computedWatcherOptions);}
这里的 getter 就是我们的 upperMsg 函数,不过他处理了我们通过 getter 来定义的情况。有了 getter 之后,就会对我们定义的每一个key创建一个Watcher。这里是我们要讲解的重点。我们暂且跳入 watcher 的构造函数中看看,在文件 core/observer/watcher 中。
深入 Watcher 类
完整的构造函数代码如下:
constructor (vm: Component,expOrFn: string | Function,cb: Function,options?: ?Object,isRenderWatcher?: boolean) {this.vm = vmif (isRenderWatcher) {vm._watcher = this}vm._watchers.push(this)// optionsif (options) {this.deep = !!options.deepthis.user = !!options.userthis.lazy = !!options.lazythis.sync = !!options.sync} else {this.deep = this.user = this.lazy = this.sync = false}this.cb = cbthis.id = ++uid // uid for batchingthis.active = truethis.dirty = this.lazy // for lazy watchersthis.deps = []this.newDeps = []this.depIds = new Set()this.newDepIds = new Set()this.expression = process.env.NODE_ENV !== 'production'? expOrFn.toString(): ''// parse expression for getterif (typeof expOrFn === 'function') {this.getter = expOrFn} else {this.getter = parsePath(expOrFn)if (!this.getter) {this.getter = function () {}process.env.NODE_ENV !== 'production' && warn(`Failed watching path: "${expOrFn}" ` +'Watcher only accepts simple dot-delimited paths. ' +'For full control, use a function instead.',vm)}}this.value = this.lazy? undefined: this.get()}
代码虽然有些长,但是大部分代码都是一些属性的初始化,其中比较重要的几个是:
lazy如果设置为true则在第一次get的时候才计算值,初始化的时候并不计算。默认值为truedeps,newDeps,depIds,newDepIds记录依赖,这是我们要讲的重点expOrFn我们的表达式本身
除了这些属性的设置之外,只有最后一行代码:
this.value = this.lazy? undefined: this.get()
注意这个设计 this.value , Vue 的设计上,Watcher 不止会监听 Observer ,而且他会直接把值计算出来放在 this.value 上。虽然这里因为 lazy 没有直接计算,但是取值的时候肯定要计算的,所以我们直接看看 getter 的代码:
Watcher.prototype.get = function get () {pushTarget(this);var value;var vm = this.vm;try {value = this.getter.call(vm, vm);} catch (e) {if (this.user) {handleError(e, vm, ("getter for watcher \"" + (this.expression) + "\""));} else {throw e}} finally {// "touch" every property so they are all tracked as// dependencies for deep watchingif (this.deep) {traverse(value);}popTarget();this.cleanupDeps();}return value};``这里我们看到了熟悉的 `pushTarget` 函数,不过这次不是清除了,而是真的把 `this` 作为一个参数传进去,那么结果就是 `Dep.target === this`。忘记这一块的童鞋,我直接把 `pushTarget` 代码再贴一遍:```jsDep.target = nullconst targetStack = []export function pushTarget (_target: ?Watcher) {if (Dep.target) targetStack.push(Dep.target)Dep.target = _target}
当我们取 upperMsg 的值的时候,全局的 Dep.target 就变成了 upperMsg 对应的 watcher 实例了。接下来就可以直接取值了:
value = this.getter.call(vm, vm)
这样,我们执行了 upperMsg 函数,取到了 msg 的大写字符串。而在 getter 函数中,我们有这样的代码 this.msg 会读取 msg 的值,因此,他会跳入 defineReactive 中的 getter 函数。
再回顾下我们在 defineReactive 中的代码:
get: function reactiveGetter () {const value = getter ? getter.call(obj) : valif (Dep.target) {dep.depend()// 省略}}
此时的 value 肯定是 msg 的值,重点是 if 函数,因为 Dep.target 就是我们为 upperMsg 创建的 watcher 实例,所以此时会执行 dep.depend() 函数,这个函数如下:
Dep.prototype.depend = function depend () {if (Dep.target) {Dep.target.addDep(this);}};
代码就一行,因为 Dep.target 就是 watcher,所以这行代码等价于 watcher.addDep(dep).让我们看看 addDep 函数:
Watcher.prototype.addDep = function addDep (dep) {var id = dep.id;if (!this.newDepIds.has(id)) {this.newDepIds.add(id);this.newDeps.push(dep);if (!this.depIds.has(id)) {dep.addSub(this);}}};
当执行 addDep 的时候会把 dep 存起来,不过这里会有之前初始化的两个数组 deps 和 newDeps,以及 depIds 和 newDepIds 两个 set。其实大家一看就能明白,这里明显是用来去重的,特别是其中的 depIds 和 newDepIds 是一个 Set。
但是这个去重的逻辑有些复杂,因为包含了两个 if,分别对 depIds 和 newDepIds 进行去重。那么为什么要进行两次去重呢? 举个栗子说明,我们首先假设我们有这样一个计算属性:
computed: {doubleMsg () {return this.msg + this.msg}}
这里进行了两次 this.msg 取值,那么显然会触发两次 getter 函数,而 getter 中的 dep.depend() 调用并没有判断任何重复条件,所以为了计算一个 doubleMsg 会两次进入 Watcher.prototype.addDep 函数。而第二次进入的时候,由于 newDepIds 已经记录了 dep 实例的id,因此会直接忽略。那么为什么第二次进入的时候 dep 和第一次是同一个呢?因为 dep 是在getter/setter外面的闭包中的,对当前 msg 来说是唯一的。
我们弄懂了 newDepIds 是怎么去重的,那么里面的那个 if 中使用了 depIds 去重,又是怎么回事呢?我们首先看看哪里用到了 newDepIds,其实是在 Watcher.protototype.cleanupDeps 函数中,而这个函数是在 Watcher.prototype.get 中调用的,我们看看 get 的代码中的 finally 是怎么写的:
finally {// 省略this.cleanupDeps();}
也就是在 get 取到值后,就调用 this.cleanupDeps ,这个函数会把 newDepIds 的值赋给 depIds,然后把 newDepIds 清空。
当Vue对 doubleMsg 进行求值的时候,会调用两次 this.msg,求值结束后,会进行 this.cleanupDeps 操作。这样求值结束之后,我们的依赖就存在于 depIds 而不是 newDepIds 中。知道了这一点之后就比较好理解了。newDepIds 只是在对 doubleMsg 进行求值的过程中,避免对 msg 的多次依赖。当求值结束之后,newDepIds 就空了吗,而依赖被记录在 depIds 中。如果我们在第一次对 doubleMsg 求值之后,再次进行求值会怎么样呢? 比如我们这样:
mounted () {this.msg = 'aaaa'}
在$mount 结束后对 this.msg 进行赋值,那么就会触发 watcher.update方法,而这里面会进行再次进行 this.msg 求值。此时,newDepIds 为空,而 depIds 有值,因此不会被重复记录依赖。
所以总结下来就是:
newDepIds可以在upperMsg的一次求值过程中,避免对msg的重复依赖depIds可以在由于msg更新而导致再次对doubleMsg求值的时候,避免对msg的重复依赖
搞懂了去重代码之后,最主要的一行代码就是 dep.addSub(this)。也就是会把 watcher 添加到 dep.subs 中。
到目前为止,我们能做到 一旦 调用 this.upperMsg 读取值,就会触发依赖收集。那么当 msg 被更新的时候,watcher.value 又是怎么知道而更新的呢?还是先看 defineReactive 中的 setter 定义:
set: function reactiveSetter (newVal) {const value = getter ? getter.call(obj) : val/* eslint-disable no-self-compare */if (newVal === value || (newVal !== newVal && value !== value)) {return}/* eslint-enable no-self-compare */if (process.env.NODE_ENV !== 'production' && customSetter) {customSetter()}if (setter) {setter.call(obj, newVal)} else {val = newVal}childOb = !shallow && observe(newVal)dep.notify()}
其中最重要的是最后一行代码 dep.notify 而这行代码就会去通知所有的 watcher ,notify 代码如下:
notify () {// stabilize the subscriber list firstconst subs = this.subs.slice()for (let i = 0, l = subs.length; i < l; i++) {subs[i].update()}}
他会调用 watcher.update 来更新 value ,这样当我们给 msg 设置了一个新的值,watcher.value 就会自动被更新。因为性能问题,watcher.update 函数默认是异步更新的,我们看看代码:
update () {/* istanbul ignore else */if (this.computed) {// A computed property watcher has two modes: lazy and activated.// It initializes as lazy by default, and only becomes activated when// it is depended on by at least one subscriber, which is typically// another computed property or a component's render function.if (this.dep.subs.length === 0) {// In lazy mode, we don't want to perform computations until necessary,// so we simply mark the watcher as dirty. The actual computation is// performed just-in-time in this.evaluate() when the computed property// is accessed.this.dirty = true} else {// In activated mode, we want to proactively perform the computation// but only notify our subscribers when the value has indeed changed.this.getAndInvoke(() => {this.dep.notify()})}} else if (this.sync) {this.run()} else {queueWatcher(this)}}
里面有很多注释,前几行是处理当有其他的值依赖我们的 upperMsg 的情况的,我们下面会讲到,这里暂且跳过。直接看最后几行代码:
if (this.sync) {this.run()} else {queueWatcher(this)}
如果是 sync 模式,那么直接调用 run 来更新 value。默认情况是异步的,所以会进入 queueWatcher(this) 方法,会把 run 的运行推迟到 nextTick 才运行。这也是我们为什么更新了 msg 之后立刻读取 upperMsg 其实内容并没有被更新的原因。因为把所有的更新都集中到 nextTick 进行,所以 Vue 会有比较好的性能。queueWatcher 其实比较简单,他会用一个队列记录所有的操作,然后在 nextTick 的时候统一调用一次。这里就不做过多介绍了,我们会有单独的一章来介绍。
到这里我们已经弄懂了 upperMsg 是如何依赖 msg 的,我画了一个图来梳理他们之间的关系:
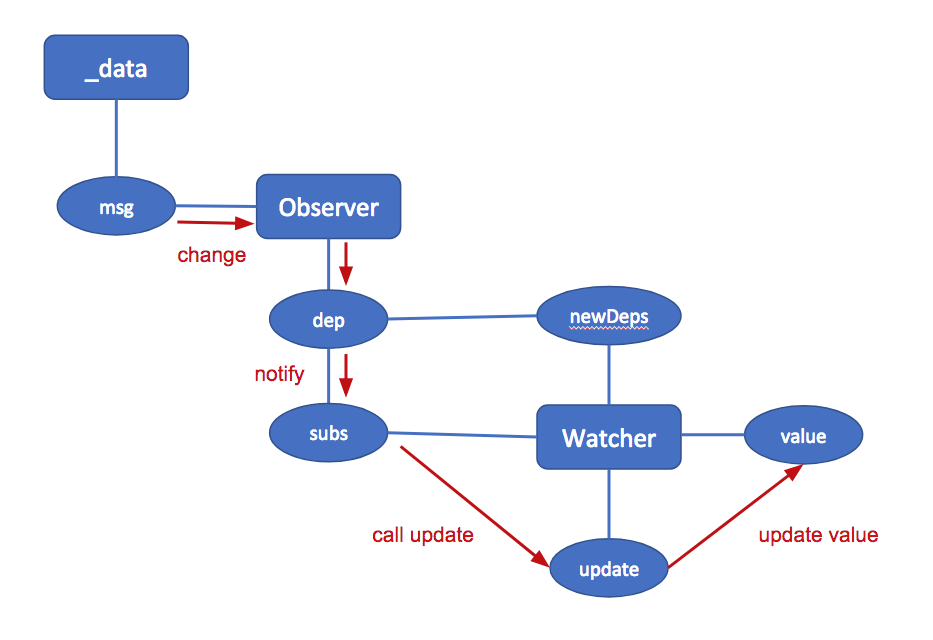
解释一下这个图,其中蓝色的线是引用关系(除了 Observer 和 dep 中间那条线,因为那条线其实是闭包而不是引用),红色的线是依赖的触发流程。
- 我们通过
this.msg = xxx来修改msg的值,他被observer监听,因此 observer 可以知道这个更新的发生 - Observer 中有一个
dep记录了依赖,他会调用dep.notify来通知那些订阅者 - dep.subs 就保存了订阅者,会调用他们的
update方法 - 调用了
watcher.update方法,经过几次调用后最终会在nextTick的时候更新this.value的值
回到 initComputed
再回到我们最开始的 initComputed 函数,前面那么多内容我们弄懂了 new Watcher 的工作原理,这个函数还有最后一段代码:
if (!(key in vm)) {defineComputed(vm, key, userDef);}
defineComputed 函数的作用是在 this 上做一个 upperMsg 的代理,因此我们可以通过 this.upperMsg 来访问。 defineComputed 代码如下:
export function defineComputed (target: any,key: string,userDef: Object | Function) {const shouldCache = !isServerRendering()if (typeof userDef === 'function') {sharedPropertyDefinition.get = shouldCache? createComputedGetter(key): userDefsharedPropertyDefinition.set = noop} else {sharedPropertyDefinition.get = userDef.get? shouldCache && userDef.cache !== false? createComputedGetter(key): userDef.get: noopsharedPropertyDefinition.set = userDef.set? userDef.set: noop}if (process.env.NODE_ENV !== 'production' &&sharedPropertyDefinition.set === noop) {sharedPropertyDefinition.set = function () {warn(`Computed property "${key}" was assigned to but it has no setter.`,this)}}Object.defineProperty(target, key, sharedPropertyDefinition)}
他会通过 Object.defineProperty 设置 this.upperMsg,依然是通过 getter/setter 来定义的,this.upperMsg 的读写会被代理到我们在 options 中定于的 upperMsg 上。不过你可能会发现,在我写的demo中,defineComputed方法根本没执行,那么 this.upperMsg 是哪来的呢?这是因为我的项目中使用了 Vue.router 他会用 Vue.extend 来创建一个自定义的类,而 Vue.extend 为了避免在创建实例的时候重复创建 upperMsg ,就把他提前创建好了。
到此我们通过对 data 和 computed 的解读,彻底弄懂了响应式的工作原理。至于 props 因为涉及到VDOM,这里暂时先不展开了,但是他的响应式部分实现和 data 是一样的。