创建 VNode
上面我们讲了mount整体流程,那么下面我们来看看 render 函数到底是如何工作的?为了能比较容易理解,我们来写一个简单的例子:
Vue.component('current-time', {data () {return {time: new Date()}},template: `<span>{{time}}</span>`})var app = new Vue({el: '#app',template: `<div class="hello" @click="click"><span>{{message}}</span><current-time></current-time></div>`,data: {message: 'Hello Vue!'},methods: {click() {this.message += '1'}}})
在这个例子中,我们注册了一个自定义组件 current-time,在 #app 中就有一个DOM元素和一个自定义组件。为什么要这样呢?因为 Vue 在创建 VNODE 的时候,对这两种处理是不一样的。
我们依然从 _render 函数为入口开始看代码(依旧省略部分不影响我们理解的代码):
core/instance/render.js
Vue.prototype._render = function (): VNode {const vm: Component = thisconst { render, _parentVnode } = vm.$options// set parent vnode. this allows render functions to have access// to the data on the placeholder node.vm.$vnode = _parentVnode// render selflet vnodetry {vnode = render.call(vm._renderProxy, vm.$createElement)} catch (e) {// 省略vnode = vm._vnode}// set parentvnode.parent = _parentVnodereturn vnode}
最核心的代码是下面这一句:
vnode = render.call(vm._renderProxy, vm.$createElement)
这里的 render 其实就是我们根据模板生成的 options.render 函数,两个参数分别是:
_renderProxy是我们render函数运行时的上下文$createElement作用是创建vnode节点
对于我们的例子来说,我们的render函数编译出来是这个样子的:
(function anonymous() {with (this) {return _c('div', {staticClass: "hello",on: {"click": click}}, [_c('span', [_v(_s(message))]), _v(" "), _c('current-time')], 1)}})
显然,这里的 this 就是 _renderProxy,在它上面就有 _c, v 等函数。这些函数就是一些 renderHelpers ,比如 _v 其实是创建文本节点的:
core/instance/render-helpers/index.js
target._v = createTextVNode
仔细观察会发现 $createElement 其实没用到。为什么呢? 因为这是给我们自己写 render 的时候提供的,而这个函数其实就是 this._c,因此编译出来的 render 直接用了 _c 而不是用了 createElement。
我们知道 _c 就是 createElement, 而 createElement 其实会调用 _createElement 来创建 vnode,我们来看看 _createElement 的代码:
core/vdom/create-element.js
export function _createElement (context: Component,tag?: string | Class<Component> | Function | Object,data?: VNodeData,children?: any,normalizationType?: number): VNode | Array<VNode> {// 省略大段if (typeof tag === 'string') {if (config.isReservedTag(tag)) { // 如果是保留的tag// platform built-in elementsvnode = new VNode(config.parsePlatformTagName(tag), data, children,undefined, undefined, context)} else if (isDef(Ctor = resolveAsset(context.$options, 'components', tag))) {// componentvnode = createComponent(Ctor, data, context, children, tag);} else {// unknown or unlisted namespaced elements// check at runtime because it may get assigned a namespace when its// parent normalizes childrenvnode = new VNode(tag, data, children,undefined, undefined, context);}//省略} else {// direct component options / constructorvnode = createComponent(tag, data, context, children)}if (Array.isArray(vnode)) {return vnode} else if (isDef(vnode)) {if (isDef(ns)) applyNS(vnode, ns)if (isDef(data)) registerDeepBindings(data)return vnode} else {return createEmptyVNode()}}
首先我们来理解参数,假设我们现在是创建如下所示的最外层 div元素:
<div class="hello" @click="click"><span>{{message}}</span></div>
那么这几个参数分别是:
context,这是vm本身,因为有这个context的存在所以我们才能在模板中访问vm上的属性方法tag就是divdata是attributes被解析出来的配置{ staticClass: 'hello', on: {}children, 其实就是_c('span')返回的span对应的vnode,被数组包了一下
我们在看函数体,几个条件判断有一点点绕,但是最终都是为了判断到底是需要创建一个 vnode 还是需要创建一个 component。我画了一个图来表示上面的条件判断: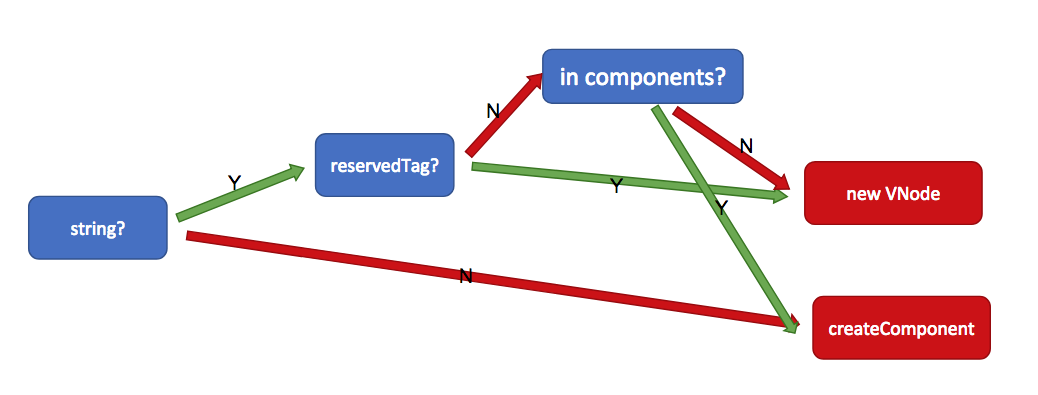
解释下 resolveAsset 其实就是看 tag 有没有在 components 中定义,如果已经定义了那么显然就是一个组件。
对这段逻辑:比较常见的情况是:如果我们的 tag 名字是一个保留标签,那么就会调用 new VNode 直接创建一个 vnode 节点。如果是一个自定义组件,那么调用 createComponent创建一个组件。而保留标签其实就可以理解为 DOM 或者 SVG 标签。
因此在我们的例子中 span 是一个保留标签,所以会调用 new VNode() 直接创建一个vnode 出来。VNode 类其实非常简单,他就是把传入的参数都记录了下来而已。因为代码比较长所以这里只贴出一部分代码,有兴趣的话可以去 **core/vdom/vnode.js` 里面看看:
core/vdom/vnode.js
export default class VNode {tag: string | void;data: VNodeData | void;children: ?Array<VNode>;text: string | void;elm: Node | void;// 省略很多属性constructor (tag?: string,data?: VNodeData,children?: ?Array<VNode>,text?: string,elm?: Node,context?: Component,componentOptions?: VNodeComponentOptions,asyncFactory?: Function) {this.tag = tagthis.data = datathis.children = children// 省略很多属性}// DEPRECATED: alias for componentInstance for backwards compat./* istanbul ignore next */get child (): Component | void {return this.componentInstance}}
那么如果是第二种情况,我们创建的是一个自定义的组件要怎么办呢?我们看看 createComponent 的代码:
core/vdom/create-component.js
export function createComponent (Ctor: Class<Component> | Function | Object | void,data: ?VNodeData,context: Component,children: ?Array<VNode>,tag?: string): VNode | Array<VNode> | void {// 省略// resolve constructor options in case global mixins are applied after// component constructor creationresolveConstructorOptions(Ctor) // 合并 options, 就是把我们自定义的 options 和 默认的 `options` 合并// transform component v-model data into props & eventsif (isDef(data.model)) {transformModel(Ctor.options, data)}// extract propsconst propsData = extractPropsFromVNodeData(data, Ctor, tag)// functional componentif (isTrue(Ctor.options.functional)) {return createFunctionalComponent(Ctor, propsData, data, context, children)}// extract listeners, since these needs to be treated as// child component listeners instead of DOM listenersconst listeners = data.on// replace with listeners with .native modifier// so it gets processed during parent component patch.data.on = data.nativeOnif (isTrue(Ctor.options.abstract)) {// abstract components do not keep anything// other than props & listeners & slot// work around flowconst slot = data.slotdata = {}if (slot) {data.slot = slot}}// install component management hooks onto the placeholder nodeinstallComponentHooks(data)// return a placeholder vnodeconst name = Ctor.options.name || tagconst vnode = new VNode(`vue-component-${Ctor.cid}${name ? `-${name}` : ''}`,data, undefined, undefined, undefined, context,{ Ctor, propsData, listeners, tag, children },asyncFactory)// Weex specific: invoke recycle-list optimized @render function for// extracting cell-slot template.// https://github.com/Hanks10100/weex-native-directive/tree/master/component/* istanbul ignore if */if (__WEEX__ && isRecyclableComponent(vnode)) {return renderRecyclableComponentTemplate(vnode)}return vnode}
最前面一大段都是对 options, model, on 等的处理,我们暂且跳过这些内容,直接看 vnode 的创建:
const name = Ctor.options.name || tagconst vnode = new VNode(`vue-component-${Ctor.cid}${name ? `-${name}` : ''}`,data, undefined, undefined, undefined, context,{ Ctor, propsData, listeners, tag, children },asyncFactory)
也就是说,其实自定义组件current-time也是创建了一个 vnode ,那么和 span 这种原生标签肯定有区别的,最大的区别在 componentOptions 上,如果我们是自定义组件,那么会在 componentOptions 中保存我们的组件信息,而 span 这种原生标签就没有这个数据:

显然,对于 span 和 current-time 的更新机制肯定是不同的。由于我们知道了 createComponent 最终也会创建一个 vnode,前面的一张图中我们可以增加一个箭头,改成这样:
回到最开头的 _render,我们知道它最终返回了一个 vnode 节点组成的虚拟DOM树,树中的每一颗节点都会存储渲染的时候需要的信息,比如 context, children 等。那么Vue是如何把 vnode 渲染成真实的DOM呢?我们在下一章讲解