模板会被编译成 render 函数
我们知道 Vue 组件可以通过两种方式写模板,一种是通过 template 写字符串,另一种方式是直接写 render 函数。我们最常用的就是 template 字符串模板。而render 函数我们一般不会用到。官方的一个 render 示例如下:
Vue.component('anchored-heading', {render: function (createElement) {return createElement('h' + this.level, // tag namethis.$slots.default // array of children)}}
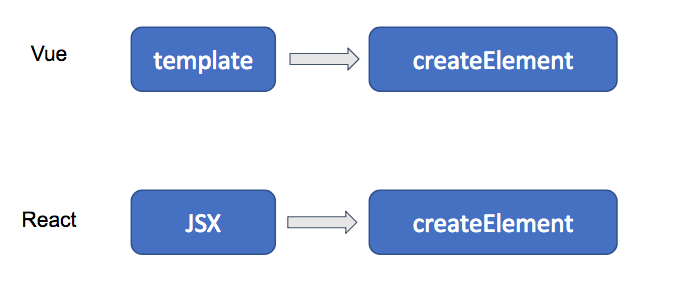
template 字符串最终会被编译成 render 函数,根据配置的不同,有可能是在webpack编译代码的时候,也可能是在运行时编译的。这一点,其实和 React 的JSX很相似。无论字符串模板还是JSX,都是为了减少我们通过 createElement 写模板的痛苦。
如果我们选择了 runtime only 的 Vue 版本,那么由于没有 compiler, 所以只能在webpack中通过 vue-loader 把 template 编译成 render 函数。因为这种做法涉及到 webpack 和 vue-loader 相关内容,这里我们讲解第二种方式,也就是通过 compiler 在浏览器中动态编译模板的方式。
render 函数如何生成
为了弄清楚模板被编译的过程,我们假设有如下代码:
<div id="app"></div><script>var app = new Vue({el: '#app',template: `<div class="hello">{{message}}</div>`,data: {message: 'Hello Vue!'}})</script>
我把代码都放在github了,如果你希望自己动手试一下,可以克隆这个仓库:https://github.com/lihongxun945/my-simple-vue-app
这里代码非常简单,就是一个模板中间输出了一个 message 变量。模板编译的入口,是在 $mount 函数中:
platform/web/entry-runtime-with-compiler
const mount = Vue.prototype.$mountVue.prototype.$mount = function (el?: string | Element,hydrating?: boolean): Component {el = el && query(el)/* istanbul ignore if */if (el === document.body || el === document.documentElement) {process.env.NODE_ENV !== 'production' && warn(`Do not mount Vue to <html> or <body> - mount to normal elements instead.`)return this}const options = this.$options// resolve template/el and convert to render functionif (!options.render) {let template = options.templateif (template) {if (typeof template === 'string') {if (template.charAt(0) === '#') {template = idToTemplate(template)/* istanbul ignore if */if (process.env.NODE_ENV !== 'production' && !template) {warn(`Template element not found or is empty: ${options.template}`,this)}}} else if (template.nodeType) {template = template.innerHTML} else {if (process.env.NODE_ENV !== 'production') {warn('invalid template option:' + template, this)}return this}} else if (el) {template = getOuterHTML(el)}if (template) {/* istanbul ignore if */if (process.env.NODE_ENV !== 'production' && config.performance && mark) {mark('compile')}const { render, staticRenderFns } = compileToFunctions(template, {shouldDecodeNewlines,shouldDecodeNewlinesForHref,delimiters: options.delimiters,comments: options.comments}, this)options.render = renderoptions.staticRenderFns = staticRenderFns/* istanbul ignore if */if (process.env.NODE_ENV !== 'production' && config.performance && mark) {mark('compile end')measure(`vue ${this._name} compile`, 'compile', 'compile end')}}}return mount.call(this, el, hydrating)}
完整的代码有些长,但是仔细看代码会发现其实逻辑很简单,代码主要包含两个 if 语句。第一段 if(template) {}else {} 的作用是处理各种不同写法的 template ,比如可能是 #id 或者是一个 DOM 元素,最终都会被转成一个字符串模板。这样经过处理之后,第二段 if(template)中的 template 就是一个字符串模板了,删除一些开发环境的性能代码,最终编译模板的代码如下:
if (template) {const { render, staticRenderFns } = compileToFunctions(template, {shouldDecodeNewlines,shouldDecodeNewlinesForHref,delimiters: options.delimiters,comments: options.comments}, this)options.render = renderoptions.staticRenderFns = staticRenderFns}}
这里调用了 ompileToFunctions 方法,传入了三个参数分别是:
- template 字符串,这里就是
<div class="hello">{{message}}</div> - 一些编译时的参数
- this
返回的结果中包含了一个 render 函数和一个 staticRenderFns 方法。我们暂时跳过 staticRenderFns ,来看看 render 函数,他其实就是一个匿名函数,由于我们的模板特别简单,因此这个函数也很简单:
ƒ anonymous() {with(this){return _c('div',{staticClass:"hello"},[_v(_s(message))])}}
只看这个函数结果显然是看不懂的,那么我们还是从源码入手,看看 compileToFunctions 函数都做了什么。
platform/web/compiler/index.js
import { baseOptions } from './options'import { createCompiler } from 'compiler/index'const { compile, compileToFunctions } = createCompiler(baseOptions)export { compile, compileToFunctions }
这里调用了 createCompiler 方法生成了 compile 和 compileToFunctions 两个方法,我们先看看 baseOptions:
platform/web/compiler/options.js
export const baseOptions: CompilerOptions = {expectHTML: true,modules,directives,isPreTag,isUnaryTag,mustUseProp,canBeLeftOpenTag,isReservedTag,getTagNamespace,staticKeys: genStaticKeys(modules)}
baseOptions 是一些编译选项,因为不同平台的编译方式不同,这里我们暂且不去深究这些选项。我们再看 createCompiler 函数的定义:
compiler/index.js
export const createCompiler = createCompilerCreator(function baseCompile (template: string,options: CompilerOptions): CompiledResult {const ast = parse(template.trim(), options)if (options.optimize !== false) {optimize(ast, options)}const code = generate(ast, options)return {ast,render: code.render,staticRenderFns: code.staticRenderFns}})
这里又是一个函数调用,createCompiler 是 createCompilerCreator 的返回值,他在调用的时候传入了一个 baseCompile 函数作为参数,从这个调用方式我们知道createCompilerCreator 肯定是返回了一个 createCompiler 函数。这是典型的柯里化,可以复用参数,减少单次调用传递参数的个数。记住这些,我们继续往下看:
compiler/create-compiler.js
export function createCompilerCreator (baseCompile: Function): Function {return function createCompiler (baseOptions: CompilerOptions) {function compile (template: string,options?: CompilerOptions): CompiledResult {const finalOptions = Object.create(baseOptions)const errors = []const tips = []finalOptions.warn = (msg, tip) => {(tip ? tips : errors).push(msg)}if (options) {// merge custom modulesif (options.modules) {finalOptions.modules =(baseOptions.modules || []).concat(options.modules)}// merge custom directivesif (options.directives) {finalOptions.directives = extend(Object.create(baseOptions.directives || null),options.directives)}// copy other optionsfor (const key in options) {if (key !== 'modules' && key !== 'directives') {finalOptions[key] = options[key]}}}const compiled = baseCompile(template, finalOptions)if (process.env.NODE_ENV !== 'production') {errors.push.apply(errors, detectErrors(compiled.ast))}compiled.errors = errorscompiled.tips = tipsreturn compiled}return {compile,compileToFunctions: createCompileToFunctionFn(compile)}}}
我们终于看到了createCompiler的真面目,这个函数其实用到了两个参数,一个是闭包中的 baseCompile,一个是自己的形参 baseOptions ,返回的结果中的 compile 是一个函数。那么 createCompileToFunctions 又是什么呢?这里我不展开了,它其实主要作用是把 compile 返回的结果中的函数字符串转化成一个真正的函数。
所以编译的主要逻辑都在 compile 函数中,我们再看函数体前面的一大段都是对 options 的处理,首先finalOptions 通过原型链完整继承了 baseOptions:
const finalOptions = Object.create(baseOptions)
然后增加了一个 warn 方法,接着对用户自定义的 modules 和directives ,全部和 baseOptions 进行了合并。baseOptions 中的指令目前包括三个 v-text, v-html 和 v-model。
在处理完 options 之后,就会调用 baseCompile 函数进行模板编译,生成的结果 compiled 结构如下:
ast模板解析出来的抽象语法树render我们前面提到的render函数,不过要注意的是,此时的render函数是一个字符串,而不是一个真正的函数staticRenderFns编译的辅助函数
而 compileToFunctions 会把 compile 包装一层,把他的结果中的 render 转换成一个可执行的函数,这才是我们最终要的结果。转换的核心代码如下:
res.render = createFunction(compiled.render, fnGenErrors)
这样经过一大推函数调用和柯里化,我们终于得到了 render 函数。至于抽象语法树的解析过程,我们会放到后面一个单独的章节来讲。
组件挂载和更新
让我们回到$mount 函数,他最终调用了 mount 函数,这个函数只做了一件事,就是调用 mountComponent 挂载组件。 mountComponent 代码比较长,其中重要的代码如下:
export function mountComponent (vm: Component,el: ?Element,hydrating?: boolean): Component {vm.$el = el// 省略callHook(vm, 'beforeMount')let updateComponent// 省略updateComponent = () => {vm._update(vm._render(), hydrating)}// we set this to vm._watcher inside the watcher's constructor// since the watcher's initial patch may call $forceUpdate (e.g. inside child// component's mounted hook), which relies on vm._watcher being already definednew Watcher(vm, updateComponent, noop, {before () {if (vm._isMounted) {callHook(vm, 'beforeUpdate')}}}, true /* isRenderWatcher */)hydrating = false// manually mounted instance, call mounted on self// mounted is called for render-created child components in its inserted hookif (vm.$vnode == null) {vm._isMounted = truecallHook(vm, 'mounted')}return vm}
最核心的代码是如下几行:
updateComponent = () => {vm._update(vm._render(), hydrating)}// we set this to vm._watcher inside the watcher's constructor// since the watcher's initial patch may call $forceUpdate (e.g. inside child// component's mounted hook), which relies on vm._watcher being already definednew Watcher(vm, updateComponent, noop, {before () {if (vm._isMounted) {callHook(vm, 'beforeUpdate')}}}, true /* isRenderWatcher */)
首先创建了一个 updateComponent 函数,他会调用 vm._update 更新组件。然后,创建了一个 watcher,只要vm发生变化,就会触发一次 update,最终会触发 getter 也就是 updateComponent 函数。我花了一个简单的图,我们可以理解组件是如何被更新的:
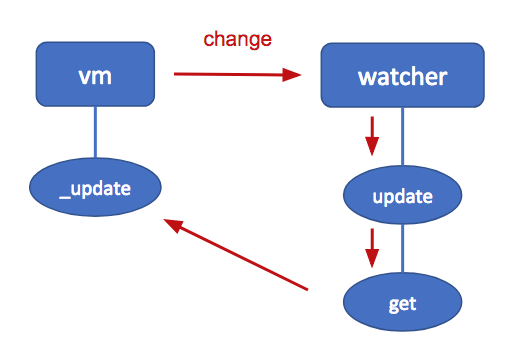
其中红色的箭头,就是我们更新了组件状态之后的调用过程。因为之前讲过 Watcher 这里我们就不再重复这一块。有了 watcher 观察,我们在 vm 上进行任何修改,比如 this.message ='xxx' 修改数据,就会触发一次更新。不过有一点需要注意一下,就是这个watcher 其实并不是 deep 的,因为 vm 本身已经是响应式的了,所以没有必要重复监听它的所有属性。
我们在本章有两个疑问没有解决:
render函数的生成过程是怎样的?回答这个问题需要我们深入到compiler内部理解他的工作原理- 而
_update函数则涉及到VDOM相关的内容
这两个问题我们在接下来的文章中解读
下一章,让我们理解 compiler 的工作原理。