简介
The UV Editor is used for editing UV maps, which describe how a 2D image should be mapped onto a 3D object.

带有UV贴图和测试网格纹理的UV编辑器。
Image textures are typically needed when the desired look is hard to achieve with procedural textures, or if the texture is not uniform. For example, a car would only have scratches in a few places where they make sense, not in random places all over its body.
Blender offers a number of projections (Box, Sphere…) that automatically apply a 2D image to a 3D object, but these tend to only work for simple meshes. For more complex ones, you need to create a UV map instead. This is a flat area where each face of the 3D object is laid out on the 2D image, specifying which part of the image it should be textured with. This gives you complete control over the mapping process.
The name “UV” refers to the axes of the map: U for horizontal, V for vertical. These letters were chosen to avoid confusion with “X” and “Y”, which refer to axes in 3D space instead.
UVs 解释
The best analogy to understand UV mapping is cutting up a cardboard box. If you were to take a pair of scissors and cut along its edges, you would be able to spread it out flat on a tabletop. As you are looking down at the table, we could say that U is the left-right direction, and V is the up-down direction.
As a next step, you could put the spread-out box on top of a poster, cut the poster to match its shape, glue the poster to the box, and finally reassemble the box. You now have a 3D box textured with a 2D image.
A UV map describes how the box is cut up, and how it’s laid out on the poster. You have complete freedom in how to do this: if you wanted to, you could cut each individual side of the box and position, rotate, scale, and even skew it on the poster independently of the other sides.
例子
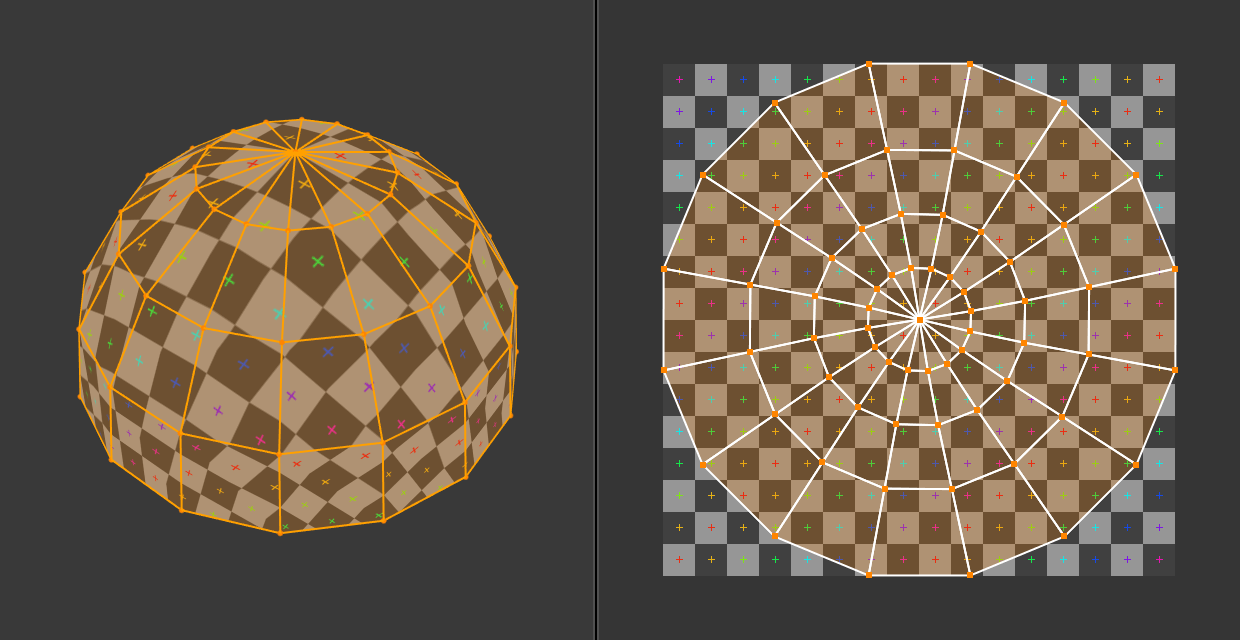
3D空间(XYZ)与UV空间。
In the above image, a dome in 3D space is flattened into a disc in UV space. Each 3D face is then textured with the part of the image it covers in the UV map.
The image also demonstrates a common problem in UV maps: distortion. Notice how, even though the checkered squares in the 2D texture are all the same size, they get different sizes when applied to the 3D dome (they’re smaller at the base than at the top). This is because the faces in the UV map have different relative sizes than in 3D space, which is a result of the flattening process.
You’ll typically want to minimize this distortion by manually guiding and tweaking the flattening, using seams for example. However, it’s not always possible to eliminate it completely.
界面
标题栏
UV编辑器标题栏。
标题栏包含几个处理UV的菜单和选项。
选区同步
Synchronizes the selection between the UV Editor and the 3D Viewport. See Sync Selection for more details.
选择模式
要选择的UV元素类型。有关更多详细信息,请参见 选择模式。
粘性选择模式
Which other vertices to select automatically. See Sticky Selection Mode for more details.
视图
用于控制内容在编辑器中的显示方式的工具。见 导航。
选择
Tools for selecting UVs.
图像
用于打开和处理图像的工具。参见 编辑。
UV
Contains tools for Unwrapping Meshes and Editing UVs.
Pivot Period
See 轴心点.
Snap Shift-Tab
See 吸附.
衰减编辑 O
见 衰减编辑。
图像
A data-block menu used for selecting images. When an image has been loaded or created in the UV Editor, the Image panel appears in the Sidebar region.
图像固定
When enabled the current image remains visible regardless of the object selection. This switching only happens if the 3D Viewport is in Edit Mode or Texture Paint Mode.
This can be useful to enable when an image is used as a reference.
Show Gizmo
Lets you show/hide all gizmos using the toggle button, or specific gizmos using the drop-down arrow.
导航
Enable/disable the gizmos used to pan or zoom the 2D viewport. See Navigation Gizmos for more information.
Show Overlays
Lets you show/hide all overlays using the toggle button, or specific overlays using the drop-down arrow. See 覆盖切换.
活动UV循环层
选择要使用的UV贴图。
显示通道
选择要显示的颜色通道。
Color & Alpha:
Enables transparency and shows a checkerboard behind the image.
颜色:
Displays the colored image, without alpha channel.
Alpha:
Displays the alpha channel as a grayscale image. White areas are opaque, black areas are transparent.
Z缓冲:
Displays the depth from the camera, from Clip Start to Clip End, as specified in the Camera settings.
红,绿,蓝:
Single color channel visualized as a grayscale image.