我的书签
我的书签
 添加书签
添加书签 移除书签
移除书签Before you begin
Before you begin the locality load balancing tasks, you must first install Istio on multiple clusters. The clusters must span three regions, containing four availability zones. The number of clusters required may vary based on the capabilities offered by your cloud provider.
For simplicity, we will assume that there is only a single primary cluster in the mesh. This simplifies the process of configuring the control plane, since changes only need to be applied to one cluster.
We will deploy several instances of the HelloWorld application as follows:
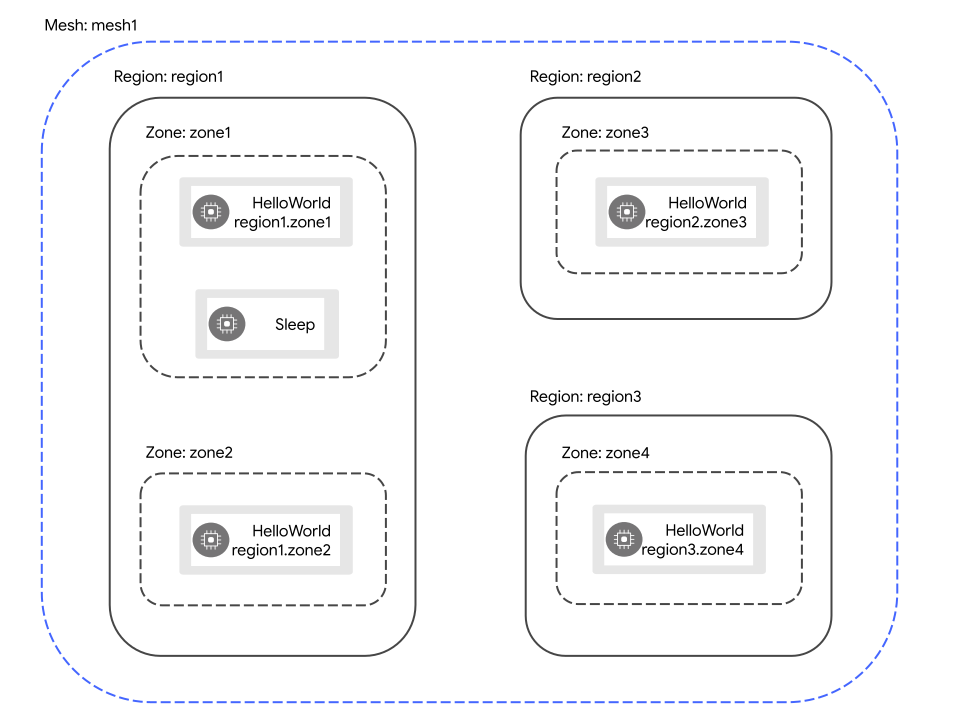
Setup for locality load balancing tasks
Environment Variables
This guide assumes that all clusters will be accessed through contexts in the default Kubernetes configuration file. The following environment variables will be used for the various contexts:
| Variable | Description |
|---|---|
CTX_PRIMARY | The context used for applying configuration to the primary cluster. |
CTX_R1_Z1 | The context used to interact with pods in region1.zone1. |
CTX_R1_Z2 | The context used to interact with pods in region1.zone2. |
CTX_R2_Z3 | The context used to interact with pods in region2.zone3. |
CTX_R3_Z4 | The context used to interact with pods in region3.zone4. |
Create the sample namespace
To begin, generate yaml for the sample namespace with automatic sidecar injection enabled:
$ cat <<EOF > sample.yamlapiVersion: v1kind: Namespacemetadata:name: samplelabels:istio-injection: enabledEOF
Add the sample namespace to each cluster:
$ for CTX in "$CTX_PRIMARY" "$CTX_R1_Z1" "$CTX_R1_Z2" "$CTX_R2_Z3" "$CTX_R3_Z4"; \do \kubectl --context="$CTX" apply -f sample.yaml; \done
Deploy HelloWorld
Generate the HelloWorld YAML for each locality, using the locality as the version string:
$ for LOC in "region1.zone1" "region1.zone2" "region2.zone3" "region3.zone4"; \do \./@samples/helloworld/gen-helloworld.sh@ \--version "$LOC" > "helloworld-${LOC}.yaml"; \done
Apply the HelloWorld YAML to the appropriate cluster for each locality:
$ kubectl apply --context="${CTX_R1_Z1}" -n sample \-f helloworld-region1.zone1.yaml
$ kubectl apply --context="${CTX_R1_Z2}" -n sample \-f helloworld-region1.zone2.yaml
$ kubectl apply --context="${CTX_R2_Z3}" -n sample \-f helloworld-region2.zone3.yaml
$ kubectl apply --context="${CTX_R3_Z4}" -n sample \-f helloworld-region3.zone4.yaml
Deploy Sleep
Deploy the Sleep application to region1 zone1:
$ kubectl apply --context="${CTX_R1_Z1}" \-f @samples/sleep/sleep.yaml@ -n sample
Wait for HelloWorld pods
Wait until the HelloWorld pods in each zone are Running:
$ kubectl get pod --context="${CTX_R1_Z1}" -n sample -l app="helloworld" \-l version="region1.zone1"NAME READY STATUS RESTARTS AGEhelloworld-region1.zone1-86f77cd7b-cpxhv 2/2 Running 0 30s
$ kubectl get pod --context="${CTX_R1_Z2}" -n sample -l app="helloworld" \-l version="region1.zone2"NAME READY STATUS RESTARTS AGEhelloworld-region1.zone2-86f77cd7b-cpxhv 2/2 Running 0 30s
$ kubectl get pod --context="${CTX_R2_Z3}" -n sample -l app="helloworld" \-l version="region2.zone3"NAME READY STATUS RESTARTS AGEhelloworld-region2.zone3-86f77cd7b-cpxhv 2/2 Running 0 30s
$ kubectl get pod --context="${CTX_R3_Z4}" -n sample -l app="helloworld" \-l version="region3.zone4"NAME READY STATUS RESTARTS AGEhelloworld-region3.zone4-86f77cd7b-cpxhv 2/2 Running 0 30s
Congratulations! You successfully configured the system and are now ready to begin the locality load balancing tasks!
Next steps
You can now configure one of the following load balancing options:
Only one of the load balancing options should be configured, as they are mutually exclusive. Attempting to configure both may lead to unexpected behavior.