简介
The first step is to unwrap your mesh. Generally, it is recommended to start unwrapping when only minor adjustments to the geometry of your model are required. If you do add faces or subdivide existing faces when a model is already unwrapped, Blender will add those new faces for you, but you may need to do additional mapping or editing. In this fashion, you can use the UV texture image to guide additional geometry changes.
关于UV
Every point in the UV map corresponds to a vertex in the mesh. The lines joining the UVs correspond to edges in the mesh. Each face in the UV map corresponds to a mesh face. Think of a UV map as projecting the surface of your 3D model onto a 2D image.
Each face of a mesh can have many UV textures. Each UV texture can have an individual image assigned to it. When you unwrap a face to a UV texture in the UV Editor, each face of the mesh is automatically assigned four UV coordinates: These coordinates define the way an image or a texture is mapped onto the face. To distinguish from XYZ coordinates, the U and V axes are used to mark the coordinates of each point. Hence the name, UV unwrapping. These coordinates can be used for rendering or for real-time viewport display as well.
在Blender中,可以为一个面关联一个独立的图像。UV坐标定义图像如何映射到面。然后图像可以用于渲染或实时显示。在3D视图中选择 面选择 模式,才能指定图像或修改活动网格物体对应的UV坐标。这样一个面可以有多张UV贴图。角色前额的面要用到面部贴图, 同时 也用到头皮/头发贴图。
这些将在下一节详述。
入门
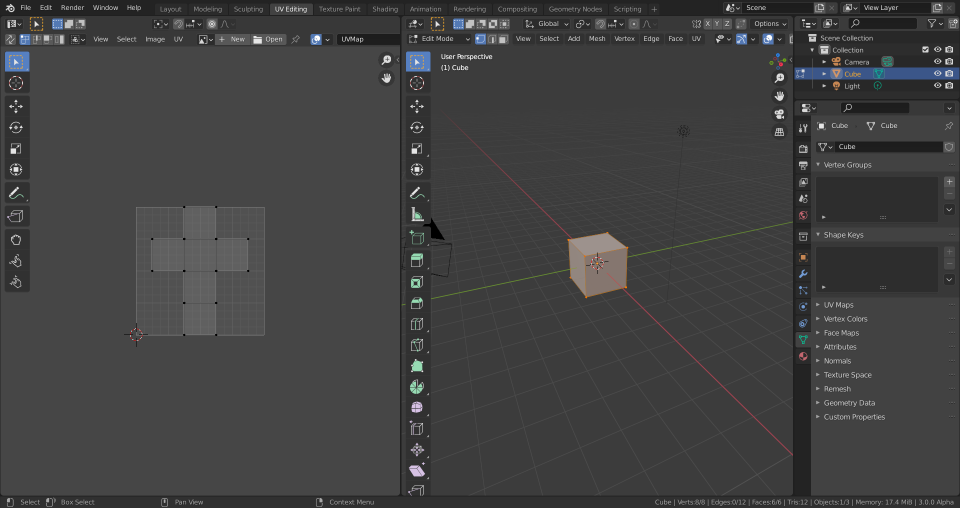
Default UV editing workspace.
默认情况下,网格是没有UV的。首先你得映射面,然后才能 编辑它们 。展开模型的过程是在3D视图编辑器的编辑模式下进行的。该流程会在 UV编辑器 创建一个或多个UV孤岛。
开始前,从屏幕顶部的用户设置标题栏选择 工作空间 为 UV Editing 。屏幕布局变为左侧UV编辑器,右侧 3D视图。
进入 编辑模式,因为所有的展开工作都要在编辑模式下。你可以使用顶点、面或边选择模式。
工作流程
The general workflow is as follows, but know that different models may require different approaches to unwrapping:
Mark Seams if necessary. See more about marking seams.
Select mesh faces in the 3D Viewport.
Select a UV mapping method from the UV ‣ Unwrap menu or the UV menu in the 3D Viewport.
Adjust the unwrap settings in the Adjust Last Operation panel.
添加测试图像,检查畸变。参考 应用图像至UV 。
在UV编辑器调整UV。参考 编辑UV 。