Krita 手册写作指引
Welcome to the Krita Manual Contribution Guide!
If you’re interested in contributing to Krita’s documentation, you’re in the right place.
Krita is (free) open source software, which effectively makes us a community project with dozens of volunteers pitching in to make it better. This, of course, requires we keep track of manuals and how-to’s for new volunteers to come in and help us. The various places we’ve done this have been rather spread out, so the contributors’ manual is an attempt to consolidate all the information. It is therefore very technical in places.
This documentation will include:
Krita 的功能参考手册
This one is probably what everyone is expecting when they look up Krita’s documentation. Dry, basic, ‘what does this button do’ type of information.
一般概念教程
然而在最近两年的观察中我们发现:功能参考手册这种文档形式,即使配有范例,对于某些用户而言还是不够友好。我们认为很有必要在使用手册里面介绍一些数字绘画领域,甚至是一般美术领域的基础知识,同时还要给用户介绍为互联网绘制图像的基本工作流程。
我们也留意到 Krita 中的某些概念,如色彩管理和图层操作等,其复杂程度远远超出了一般画手的日常理解范畴。Krita 是自由免费的,所以我们的许多用户也从未接受过正式的数字绘画培训。而在此之前,互联网上也很难找到面向画手编写的,关于色彩管理或者滤镜图层的教程。因此填补空白的任务就只能由我们自己来完成了。
In addition there are systems that are unique to Krita, for example the brush system, the transform masks, the alpha inheritance and the perspective assistants. Finally, there are users who aren’t familiar with even standard painting workflows, and are not flexible enough to understand how to port a tutorial for SAI or Photoshop to Krita.
教程和视频教程列表
Krita 团队一直与使用软件的画手保持着密切的联系,对他们的创作进行支持和鼓励,而对于教程的制作我们也秉持同样态度。每个人使用软件的习惯和对绘画的理解千差万别,我们应当鼓励人们分享他们的经验。
Contributors’ Manual
What you’re reading right now!
krita.org 教程
krita.org 和 krita-foundation.tumblr.com 这两个网站上面一直在更新各种教程。前者主要介绍如何使用某项新功能,后者主要围绕用户关心的问题进行解答。
常见问题解答
我们已经把以前整理的无数个常见问题解答整合到了此页面,翻译工作也正在进行。我们打算从现在开始把它用作首选的常见问题解答页面,并一直保持其信息更新。
新手指引
与 Mediawiki 不同,为 Sphinx 编写文档的流程更像是我们为 Krita 编写代码的流程。
First things first, you will want to talk to us! For this you can join us in the chatroom “#krita” via matrix. A introduction about Matrix is given here. Create a matrix on webchat.kde.org account and join the #krita:kde.org channel. Or more importantly, make an account at identity.kde.org. The account you make at identity can be used to both access invent.kde.org as well as the phabricator, where we organise Krita development.
Sphinx 文档是通过使用了 reStructuredText 标记语言的纯文本编写的。Sphinx 系统会把你编写的纯文本代码转换成网页版手册和电子书。我们通过一个叫做 Git 的版本控制系统来跟踪使用手册的内容变化。
更改内容
由于我们使用 Git,只有少数人有权限向版本控制系统中推送内容。如果你想要对手册内容作出更改,你必须把作出的改动送交审查。
Creating merge requests using Edit mode
注解
This method is only suitable if you have no push access to KDE repositories. Otherwise it would commit your changes directly to the repository, which is against the current guidelines.
Recommended for users without a technical knowledge.
Not recommended when you want to change more than one file at once. (See Creating merge requests using WebIDE or Creating merge requests using command line if you want to change more files, or simply edit only one per merge request).
If you have a lot of changes you want to contribute, we recommend trying to follow these instructions.
获取一个 KDE Identity 账户。
登录到 KDE_gitlab 。
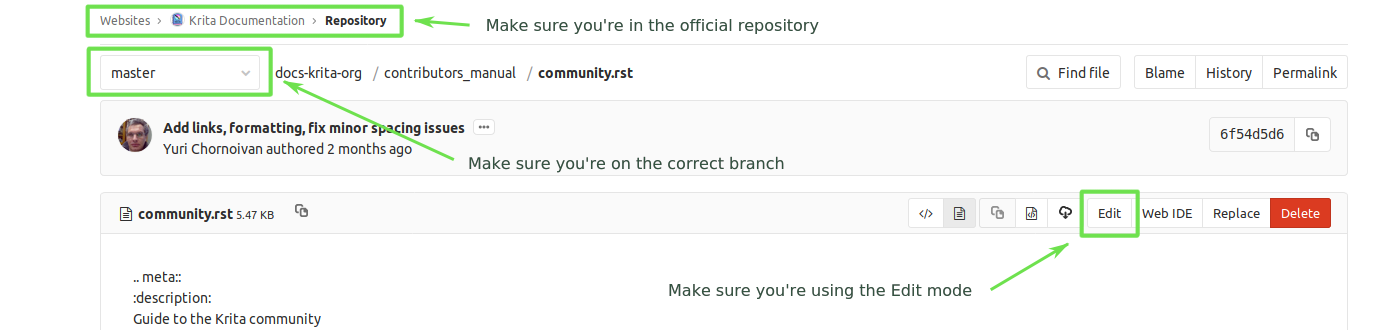
Go to the repository and press fork.
您应该会被重定向到您 fork 的仓库中。通常位于
invent.kde.org/YOUR_KDE_LOGIN_NAME/docs-krita-org。Come back to the official repository. Make sure you’re browsing
Documentation > Krita.org Documentation, not your own fork. Otherwise this method won’t work correctly.
Gitlab has an option to Edit files in the gitlab itself. To access this, go to Repository ‣ Files.
At the top of the page you should see a dropbox with
masteras a chosen item.Find the file you want to edit, open it and then click Edit.
Make your changes. (Note: in this mode you can edit only one file at a time).
Go to the smaller textbox below and write a nice message in the commit message section with the changes you’ve made. When done, press Commit changes. This will make a merge request for you, just fill in all of the fields as explained here: Guidelines for new merge requests.
The downside is that right now there’s no way to tell if you made errors with the mark up using this method. Please check your changes with the Online Sphinx Editor (just copy and paste the entire file you’re editing).
注意
Edit and WebIDE are two different things! Make sure you select Edit.
Creating merge requests using WebIDE
Recommended for users with a bit of knowledge about Git that want to edit multiple files at once.
Not recommended when you don’t know what a branch is (see Creating merge requests using Edit mode instead).
Follow the instructions above to login to KDE_gitlab and create your fork.
Go to your fork (make sure the url contains your username).
Make sure you’re on the
masterbranch.Click WebIDE. This should take you to a page that has a list of files on the left side and a big empty space for file contents on the right side.
Open the files you want to edit and make the changes.
Click Commit…. Double-click on all files in the Unstaged changes category to move them to Staged changes.
Click Commit… again - it will expand a commit message textbox. Write commit message that explains what changes have you made and why.
Make sure the settings are correct: you need to select Create a new branch (the name of the branch should be:
[username]/[very short description of your changes]). If you finished your changes, make sure that Start a new merge request is checked. Otherwise you’ll need to make a new merge request manually later.Click Stage & Commit.
Fill all of the fields correctly: see Guidelines for new merge requests.
To create a new merge request manually, go to Krita Manual official repository (make sure the url doesn’t contain your username now) and click Create a new merge request (bright green button at the left). Select your fork and select the branch that you’ve created in WebIDE.
注解
If you don’t have a push access to the official repository, gitlab won’t allow you to save your changes if you were editing the official repository by mistake (and Create a merge request won’t help with that: you still need to commit your changes to your branch, but if you don’t have push access, you can’t do it). It will just show the message: An error occurred whilst committing your changes. Please try again.
In this case, simply copy contents of all of the files you changed, go to your fork and paste them in the fork WebIDE.
Creating merge requests using command line
Recommended for users that know how Git works and how to use command line.
Not recommended when you don’t know what a branch is (see Creating merge requests using Edit mode instead).
Follow the instructions above to login to KDE_gitlab and create your fork.
Clone the repository locally with git clone. The repository page has the urls you can perform git clone from, and you can then push to your fork. The advantage of this is that you can use all the tools on your computer to edit these text files as well as build the manual locally to check for errors. (You need to do this step only once).
# for ssh accessgit clone [email protected]:<username>/docs-krita-org.gitgit remote add upstream [email protected]:documentation/docs-krita-org.git# for https accessgit clone https://invent.kde.org/<username>/docs-krita-org.gitgit remote add upstream https://invent.kde.org/documentation/docs-krita-org.git
Remember to always pull changes from the official repository before making new changes:
git pull upstream master
Make sure you create a new branch for your changes, since september 2019, all changes should be branched from
master.git checkout master# and then:git checkout -b "<username>/<description of the new feature>"
After you make your changes, commit them and push to your fork. For a detailed description of how to use Git in terminal in case of this workflow, go to Forking on Gitlab.
# install the python3-sphinx package for your system. For example for Ubuntu:sudo apt install python3-sphinx# build the manual (reports potential errors, allows to inspect changes in the browser)make html# make sure everything is correctgit statusgit diff# add all of the filesgit add .# commit your changesgit commit# submit your changes to your forkgit push
Finally, go to the website of the original repository, and then to Merge Requests. Select your fork and the correct branch and create a new merge request. For instruction on how to fill the fields, see Guidelines for new merge requests.
Guidelines for new merge requests
Your commit messages should conform to standards explained here: How to Write a Git Commit Message
Title and Description should explain what changes did you make and why did you make them, just like a commit message, so follow the guidelines from the link above in this case, too.
Target should point to
master.If you’re sure the merge request will demand some changes later, start the title of your merge request with
[WIP].Make sure you checked Allow commits from members who can merge to the target branch. – it is often needed for technical reasons that merge request is rebased on master, which technically changes the merge request, but it doesn’t change the actual content of it. Rebase can be done by you or by the reviewer – if you don’t want to be bothered later too much, better check this checkbox so the reviewer can do it themselves with only a few clicks.
You can safely check Delete source branch when merge request is accepted in most cases.
Unless your reviewers tell you otherwise, check Squash commits when merge request is accepted. The first line of the commit message will come from the Title of your merge request and the rest of it will be taken from the Description of the merge request.
When you finish creating your merge request, go to IRC (see 互联网中继聊天) and ask someone with push access to add the
Needs Reviewlabel on your merge request.You might get feedback on your merge request if it has mistakes. Just fix the mistakes in your branch in one of the following ways.
If you want to use Edit mode, just go to Changes section of the merge request and click on the pencil icon (with a tooltip that says Edit) to use the Edit mode again.
If you want to use WebIDE mode, go to your fork, select the branch your changes are on and go to the WebIDE.
If you edit files on your computer and work with terminal, make sure you’re on the correct branch and push your changes - gitlab will update your merge request automatically.
After making changes, make sure you ask someone to change the label to
Needs Reviewagain.
For more detailed information, check out Forking on Gitlab in the technical section.
注解
At the time of writing this guide setting labels on merge requests is only possible by contributors with write access to the official repository. (If you don’t know what that means, you’re most probably not one of them). Because of that, when you create or change your merge request you need to get on IRC (see Krita 社区工作) and ask someone to label it for you.
Building the manual in the command line
For those that first want to try out some changes before embarking on a merge request right away (and already know how to use git and the command line) this is described as part of step 5. in Creating merge requests using command line.
指导思想
无论是从务实还是从审美的角度,写作行为的背后往往会有一个目的,这就是指导思想。写作的指导思想决定了写作的风格。我们想要通过使用手册达成什么目的,它的目标受众又是怎样的呢?
用户群体与目标受众
Krita 的用户基数庞大,来自五湖四海、各行各业,我们为拥有如此多样化的用户群体而感到骄傲。也正因如此,我们在讨论 Krita 的用户群体时不能把每个人当成是 55 岁的老头子。
尽管如此,我们还是能总结出一些共同点:
他们都是画手,而画手就是我们服务的目标群体。
他们喜欢精美的画作。
他们以视觉方式思考。
他们想要创作出精美的画作。
所以,使用手册的每个页面的目标都是教会他们使用所介绍的特性去创作出精美的画作。
在这之上我们也留意到下列细分群体:
High-school and college students trying out drawing software for illustrations. These usually have some previous experience with drawing software, like Paint Tool SAI or Photoshop, but need to be introduced to possibilities in Krita. This group’s strength is that they share a lot of information with each other like tips and tricks and tutorials.
从业人员,使用数字绘画软件来谋生的人员。该群体的优势是他们已经积累了丰富的行业经验,也乐意为改进程序而捐款。他们有两类人:
非技术从业人员。这些人不一定能理解软件里面比较数学化的部分,不过他们在长年与软件打交道的过程里磨练出了敏锐的直觉,建立了可靠的工作流程。他们大多是画手和负责印刷的人员。
技术从业人员。他们把 Krita 用在软件流水线的一个环节,所以更加关注精确运算和像素信息的处理。他们大多供职于游戏和电影特效业界,但时不时也会出现一两位科研人员的身影。
成年和老年绘画爱好者。他们对计算机并不熟悉,特别容易被教程忽略的某个步骤给卡住。相比起人生经验欠缺的学生和无暇探索未知的从业人员,他们的优势是可以从生活实际出发建立一套非主流却不乏闪光点的工作流程。在社区整体中他们还发挥着平衡那些躁动的学生群体的功能。
在这四个群体中…
只有一个懂技术的群体。所以我们要准备一般概念页面,为手册的编写工作奠定一个坚实的基础。
有三个群体很有可能已经使用过别的绘画软件,他们需要指引来迁移至 Krita,向他们介绍想要的功能如何使用。
有两个群体需要学习如何使用 Krita 与其他软件进行配合。
有两个群体严重缺乏相关经验和知识,可能需要在最基本的环节为他们提供指引。
从上面的分析我们可以得出以下准则:
写作通则
尽可能使用美式英语
因为 Krita 的界面默认使用美式英语,所以我们在使用说明中也使用美式英语。
文明用语,但不要使用学术语言
作为一个社区,我们希望能对用户展现出友好的姿态,所以要避免使用那些不友好的行文方式。KDE 社区反对粗俗的言行,但我们也不鼓励过于学术化的文风。如果作者忽视了这一点而读者又没有意识到这只是一种写作风格,那么文字就会显得过于繁复,容易吓倒我们的用户。
Avoid using GIFs (open for debate)
The reason is that people with epilepsy may be affected by fast moving images. Similarly, GIFs can sometimes carry too much of the burden of explanation. If you can’t help but use GIFs, at the least notify the reader of this in the introduction of the page.
保持文章的翻译友好性
This consists of using SVG for infographics, and using the appropriate markup for a given text.
关于照片和传统画作
我们不鼓励大家在使用手册里使用照片和传统画作,除非它们被用来解释某种概念。理由很简单,使用 Krita 创作的新作那么多,又何必在 Krita 的界面里用伦勃朗的名作示例,这不但莫名其妙,还可以说带有某种欺骗性。Pepper & Carrot 漫画是用 Krita 创作的,它们的源文件也是公开的,如果你要找一张图使用,可以考虑采用这部作品的素材。Krita 是绘画软件,要是在使用手册里展示太多照片,会让人感到 Krita 是一款修图软件,而这并不是我们的目标。
当然,我们也需要通过照片和绘画名作来介绍某些概念,例如厚涂法和间接光照等。使用名作和照片时应为图像配上说明文字。如果是画作,应介绍作品名称和作者。如果是照片,则应注明它是一张照片。
照片可以用于后期拼接,但只应在后期拼接的有关文章中使用。
图像通则
避免在图像中直接嵌入文本,尽量使用配图文字。你可以用 figure 标记生成带说明文字的图像。
如果必须使用文字,应将图像制作成 SVG 以便于日后修改,或将字数控制在最小限度。
尽可能制作精美的图像,让人们知晓这是一款绘画用的软件。
请牢记本手册是用 GDPL 1.3 许可证发布的,它包含的图像也将以相同许可证发布。如果图像是 CC-BY-SA/CC-BY 许可证授权的,记得用 figure 标记给它们的作者进行署名。切勿使用那些无法通过上述许可证发布的图像。
写作流程
现在让我们介绍一下整个无聊的写作流程吧。
标记和分支
内容的增删作业将在 draft 分支进行。
对已有页面审校被视作问题修复,因此将被推送至 master 分支,然后再按需合并至 draft 分支。
在 draft 分支为新版本发布进行合并之前:
现有的 master 分支将会被标记为旧版本。
首先检查该 draft 分支是否更新了版本号和 epub 封面。
该 draft 分支在新版发布的前一天才会被合并,以保持页面的一致性。
作为每次新版发布流程的一部分,新版的 epub 文件也要进行上传。
移除页面
If a feature is removed in a certain version, the corresponding pages:
首先相关页面将被标记为已废弃。
做法如下:
.. deprecated:: version numberText to indicate what the user should do without this feature.
该页面将在一个叫做“已废弃”的页面显示链接
If the next version rolls around, all the pages linked in the deprecated section will be removed.
新增页面
确保页面所在的位置正确。
按照 Krita 手册标记语言使用指引 的要求编写页面,保证格式正确。
将页面添加到 TOC。
如果这是一项新特性,把首次出现的版本号添加至 versionadded:
.. versionadded:: version numberoptional something or the other.
与使用图像时一样,切勿将未经授权的文字写入页面。这意味着你添加的文字要么是你原创的,要么是文字的原作者授权你转载的。本使用手册使用 GDPL 1.3+ 许可证发布,所有文字也将用该许可证重新发布。
更改页面
如果你完全重写了某个页面,而不是单纯地进行审校,则重写的成果应被提交审查。
如果你根据软件特性的变化改写页面,而你也拥有提交权限,则该改动的推送可以无需审查 (除非你认为需要审查)。不过你要在页面上加入:
.. versionchanged:: version numberThis and that changed.
无论是哪种情况,请选择是否要把你自己添加到顶部元数据区域的作者字段中。
把 deprecated、versionadded 和 versionchanged 标记指令配合版本号使用,这样我们便可以使用 grep 命令来对被标记的页面进行查找:
grep -d recurse versionadded * --exclude-dir={_build,locale}
报告页面问题
如果某个页面的内容有问题,可以…
Make a merge request per the 更改内容 section.
在 Phabricator 的 Manual Project Workboard 上面创建一个任务。
在 bugzilla 的 Krita 项目的“文档”组件处提交问题报告。
审校
审校工作有两类。
The most important one is reviewing changes people make. You can do this on KDE_gitlab in two ways:
Reviewing merge requests
You can help review merge requests. Request reviewing is usually done by programmers to find mistakes in each other’s code, but because programming code is text based just like regular text, we can use this to check against typos as well!
A merge request, is an amount of changes done in a document (added, removed) put into a machine readable file. When someone submits a review request (on system like gitlab or github this is a merge or pull request), people who maintain the original files will have to look them over and can make comments about things needing to change. This allows them to comment on things like typos, over-complicated writing but also things that are incorrect. After a patch has been accepted it can be pushed into the version control system.
Commenting on changes in the manual.
Commenting changes happens after the fact. You can comment on a change by going to the commit message (from the repository page, go to history and then click on an entry), where you will be able to make comments on the changes made.
In both cases, the interface consists of the difference being shown, with on the left the old version, and on the right the new version. Lines that have been added will be marked in green while lines that have been removed will be marked with red. You can click a speech bubble icon to add an ‘inline’ comment.
第二类审校工作是 针对整个文件 进行的。很多页面仅接受过正确性检查,而写作风格和语法则被忽略了。而这就是整体审校的意义了。
要进行整体审校,请参考 更改内容 一节,获取页面的完整访问权限以便进行编辑。
翻译
使用手册的翻译工作由 KDE 本地化社区 负责进行。要加入翻译团队,可访问该网站,在 翻译小组列表 处选择你要翻译的语言,然后按照该小组页面上的指引来与其他翻译人员建立联系。
本地化小组成员有权限访问本手册的 PO 文件,这是一种专门用于翻译的文件格式,可用 POEdit 和 Lokalize 打开。翻译小组对这些文件进行翻译后上传至 KDE 翻译的 SVN 系统。一个特殊的脚本每天都会从该 SVN 把新的译文取回并整合进使用手册项目里。
Images can be translated if a translation team wants to provide their own images. All images in the image folder are by default for ‘en’. When you want to translate a specific image, go into that folder and add another folder with your language code to add in the translated versions of images. So Sphinx will search for a dutch version of /images/Pixels-brushstroke.png at /images/nl/Pixels-brushstroke.png and for a dutch version of /images/dockers/Krita-tutorial2-I.1-2.png in /images/dockers/nl/Krita-tutorial2-I.1-2.png.
翻译的成果还需要被添加到编译脚本里才能在网上显示。对成果感到自信的翻译小组请通过 kimageshop 邮件列表 (kimageshop@kde.org) 或电邮地址 foundation@krita.org 联系 Krita 核心团队协助处理。
其他
For restructured text conventions, check Krita 手册标记语言使用指引.