理解和处理图像
计算机可以处理不同类型的文件,而作为绘画程序,Krita 能够创建和处理图像文件。
图像文件包含的数据
如果你创建了一个文本文档,它里面文字的字母会依照某种顺序进行排列,这样计算机才能把字母读取并显示成连贯的句子。这种排序方式就是该文本文档的格式。每种文件都有自己的格式,图像文件也不例外。Krita 的图像文件包含下列数据:
栅格数据
This is the main data on the paint layers you make. So these are the strokes with the paint brush and look pixelated up close. A multi-layer file will contain several of such layers, that get overlaid on top of each other so make the final image.
单层图像文件通常只包含栅格数据。
矢量数据
这里保存的是一些数学运算,计算机通过这些运算决定如何绘制画面,这个特点使得它们具有更好的伸缩性。你只需要告诉该运算把坐标值增大 4 倍,生成的图像就可以跟着放大,而放大后的细节不会有任何损失。矢量数据的体积更小,可编辑性也更好,但代价是消耗更多的 CPU 资源。
操作数据
这里保存了软件在各种图层中进行的操作,例如用来调整其他图层颜色的滤镜图层、透明度蒙版、分组图层和变形蒙版等。不同软件的操作数据格式有所差别,Krita 对这些数据的支持情况取决于文件是由哪些软件生成的。例如,Krita 能够载入和保存 PSD 文件的分组、透明度蒙版和图层样式,但无法载入和保存它的变形蒙版。
元数据
元数据是一组记录了创建日期、作者、描述文字等信息的数据,它也包括了 DPI (每英寸点数) 等文件格式的特有信息。
图像大小
图像大小包括了两个方面:画布的尺寸和分辨率,它们的大小直接影响 Krita 文档的体积。需要记录的像素越多,颜色的位深度越高,则生成的文件体积越大。
DPI 与 PPI
DPI stands for Dots per Inch, PPI stands for Pixels per Inch. In printing industry, suppose if your printer prints at 300 DPI. It means it is actually putting 300 dots of colors in an area equal to an Inch. This means the number of pixels your artwork has in a relative area of an inch.
DPI is the concern of the printer, and artists while creating artwork should keep PPI in mind. According to the PPI you have set, the printers can decide how large your image should be on a piece of paper.
现列出部分 PPI 标准如下:
72 PPI
This is the default PPI of monitors as assumed by all programs. It is not fully correct, as most monitors these days have 125 PPI or even 300 PPI for the retina devices. Nonetheless, when making an image for computer consumption, this is the default.
120 PPI
这个数值经常被用作低质量海报的标准。
300 PPI
这个数值是高质量印刷的最低限度。
600 PPI
漫画线稿使用的品质。
颜色位深度
我们在 色彩管理 章节对颜色的位深度进行了探讨。Krita 不但可以为图像指定色彩空间,还可以为图层指定色彩空间。我们可以通过巧用图层色彩空间来节省内存。例如,把线稿图层设为灰阶,可将内存的消耗量减半。
图像色彩空间、图层色彩空间、色彩转换
Because there’s a difference between image color space and layer color space, you can change only the image color space in Image ‣ Properties… which will leave the layers alone. But if you want to change the color space of the file including all the layers you can do it by going to Image ‣ Convert Image Color Space… this will convert all the layers color space as well.
作者和描述信息

Krita will automatically save who created the image into your image’s metadata. Along with the other data such as time and date of creation and modification, Krita also shows editing time of a document in the document information dialog, useful for professional illustrators, speed-painters to keep track of the time they worked on artwork for billing purposes. It detects when you haven’t performed actions for a while, and has a precision of ±60 seconds. You can empty it in the document info dialog and of course by unzipping you .kra file and editing the metadata there.
These things can be edited in File ‣ Document Information, and for the author’s information Settings ‣ Configure Krita… ‣ Author. Profiles can be switched under Settings ‣ Active Author Profile.
设置画布背景色
You can set the canvas background color via Image ‣ Image Background Color and Transparency… menu item. This allows you to turn the background color non-transparent and to change the color. This is also useful for certain file formats which force a background color instead of transparency. PNG and JPG export use this color as the default color to fill in transparency if you do not want to export transparency.
If you come in from a program like Paint Tool SAI, then using this option, or using As canvas color radio button at Background: section in the new file options, will allow you to work in a slightly more comfortable environment, where transparency isn’t depicted with checkered boxes.
基本变形
There are some basic transforms available in the Image menu.
Shear Image…
此功能可以把图像和所含的全部图层进行斜向扭曲。
旋转
This show a submenu that will allow you to rotate the image and all its layers quickly.
Mirror Image Horizontally/Vertically
此功能可以把图像和所含的全部图层进行翻转。
除此之外我们还有更多的相关选项,下面将继续介绍。
裁切和调整画布大小
要对图像进行裁切,可使用 裁切工具。此功能可用于切除多余的空白和改善构图。
修剪
Using Image ‣ Trim to Current Layer, Krita resizes the image to the dimensions of the layer selected. Useful for when you paste a too large image into the layer and want to resize the canvas to the extent of this layer.
Image ‣ Trim to Selection is a faster cousin to the crop tool. This helps us to resize the canvas to the dimension of any active selection. This is especially useful with right-clicking the layer on the layer stack and choosing Select Opaque. Image ‣ Trim to Selection will then crop the canvas to the selection bounding box.
菜单栏的 图像 ‣ 修剪至图像大小 功能可以按照图像尺寸对所有图层进行修剪,去除图像边框之外的不可见区域的内容,减小文件的体积。
调整画布大小
You can also resize the canvas via Image ‣ Resize Canvas… (or the Ctrl + Alt + C shortcut). The dialog box is shown below.
In this, Constrain proportions checkbox will make sure the height and width stay in proportion to each other as you change them. Offset indicates where the new canvas space is added around the current image. You basically decide where the current image goes (if you press the left-button, it’ll go to the center left, and the new canvas space will be added to the right of the image).
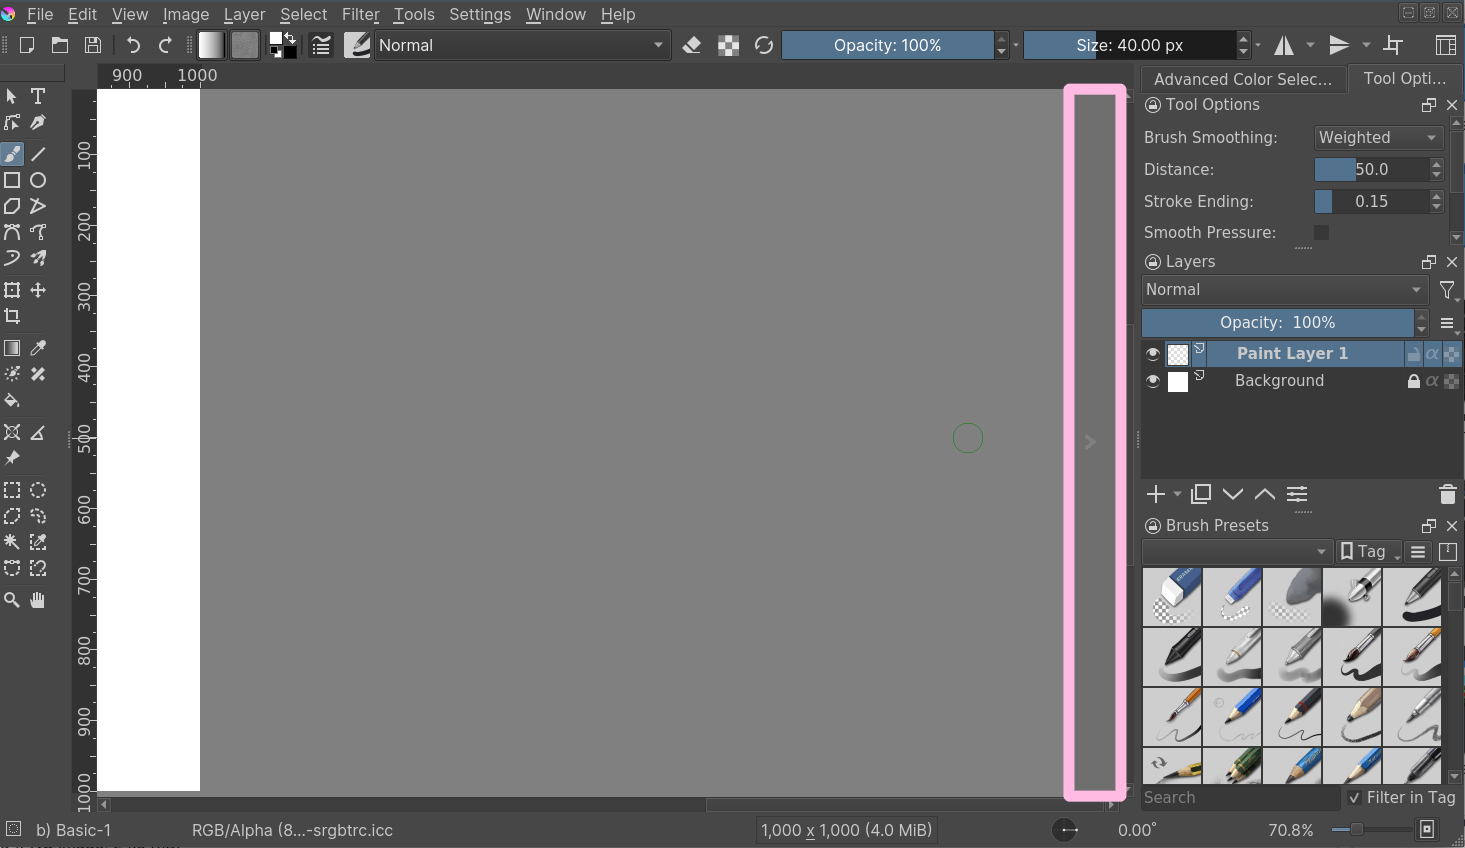
Another way to resize the canvas according to the need while drawing is when you scroll away from the end of the canvas, you can see a strip with an arrow appear. Clicking this will extend the canvas in that direction. You can see the arrow marked in red in the example below:
缩放图像至新尺寸
Scale Image to New Size… allows you to resize the whole image. Also, importantly, this is where you can change the resolution or ;dfn:upres your image. So for instance, if you were initially working at 72 PPI to block in large shapes and colors, images, etc… And now you want to really get in and do some detail work at 300 or 400 PPI this is where you would make the change.
Like all other dialogs where a chain link appears, when the chain is linked the aspect ratio is maintained. To disconnect the chain, just click on the link and the two halves will separate.
分离图像
这是一个功能强大的图像处理功能,可以把一张图像的颜色通道分离开来。
此功能对于印刷和处理游戏材质尤为有用。虽然 Krita 没有提供反向合并的功能,但你可以把分离出来的图层设为“相加” 混色模式 来模拟合并后的效果。
For grayscale images in the RGB space, you can use the Copy Red, Copy Green and Copy Blue blending modes, with using the red one for the red channel image, etc.
保存、导出和打开文件
Krita 在创建或者打开一个文件之后,它会把该文件的数据保存一份副本到内存里,以供它编辑时使用。这是计算机的工作原理所决定的:它们要把文件加载到内存里面才能对其进行操作。在保存文件时,Krita 会用内存中的副本覆盖硬盘上的已有文件。图像的打开和保存操作有下面几种:
保存
Krita 会把当前内存中的图像保存到硬盘上的指定位置。如果该文件之前未被保存过,Krita 会询问应该把它保存在什么位置。
Save As…
把当前打开的文件在另一个位置保存为副本。保存结束后 Krita 会切换到该新文件继续编辑。
Open…
打开已有文件。
Export…
把一个文件保存一个副本到新位置,但保存后不切换到导出的文件,而是继续使用当前文件进行编辑。如果你在处理一个多图层文件,需要输出一个平整后的图像与他人分享,这个功能将非常有用。
Open Existing Document as Untitled Document…
这个功能不太好理解,它所做的是打开一个已有文件,但在保存时会询问一个新位置来把结果保存为原始文件的一个副本。在其他程序里此功能叫做“导入”。
从当前图像创建副本
Makes a new copy of the current image. Similar to Open Existing Document as Untitled Document…, but then with already opened files.
保存增量版本
Saves the current image as filename'_XXX.kra and switches the current document to it.
保存增量备份
Copies and renames the last saved version of your file to a backup file and saves your document under the original name.
注解
Since Krita’s file format is compressed data file, in case of a corrupt or broken file you can open it with archive managers and extract the contents of the layers. This will help you to recover as much as possible data from the file. On Windows, you will need to rename it to filename.zip to open it.