
法向
See also
The 法线编辑修改器 can be used to edit normals.
The 加权法向修改器 can be used to affect normals by various methods,including Face Strength (see below).
也可以用数据传递 (操作 或 修改器) 从另一个网格复制法线.
着色
参考
| 模式: | 物体模式 |
|---|---|
| 菜单: | Object ‣ Shade Smooth / Shade Flat |
参考
| 模式: | 编辑模式 |
|---|---|
| 菜单: | Mesh ‣ Shading |
| 菜单: | Face ‣ Shade Smooth / Shade Flat |
平直
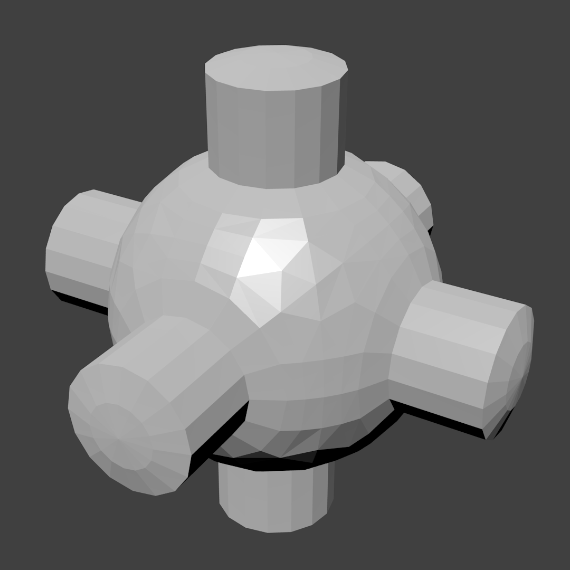 |  |
如前面的章节所见,多边形对于Blender很重要。大多数物体是使用多边形表示的,并且真正的曲面物体也是多边形网格的近似效果。在渲染图像时,你可能注意到这些多边形看上去就是一系列平直的小平面。有时候要的就是这样的效果,但是通常我们还是希望物体看上去漂亮而光滑的。
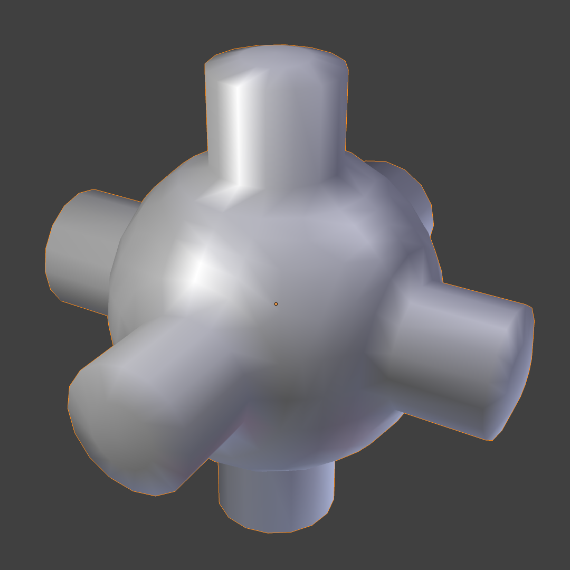
光滑
The easiest way is to set an entire object as smooth or faceted by selecting a mesh object,and in Object Mode, select Shade Smooth in the Object menu.This forces the assignment of the "smoothing" attribute to each face in the mesh,including when you add or delete geometry.
可以注意到物体的轮廓仍然是棱角分明的。激活光滑属性实际上并没有修改物体的几何形状,只是改变了表面着色的计算方式(对法向进行插值),造成光滑表面的错觉而已。
Select the Shade Flat item in the Object menuto revert the shading back (normals will be constant)to that shown in the first image above.
平滑部分网格
Alternatively, you can choose which faces to smooth by entering Edit Mode,then selecting some faces and picking Shade Smooth from the Face Menu.
When the mesh is in Edit Mode,only the selected faces will receive the "smoothing" attribute.You can set faces as flat (removing the "smoothing" attribute)in the same way by selecting edges and picking the Shade Flat from the Face Menu.
See also
The Auto Smooth option is a quick and easy way to combine smooth andfaceted faces in the same object.
Face Strength
Another way to affect normals is to set a Face Strength on the faces of the model.The Face Strength can be either Weak, Medium, or Strong.The idea is that the 加权法向修改器 canbe set to pay attention to the Face Strength as follows:when combining the normals that meet at a vertex, only the faceswith the strongest Face Strength will contribute to the final value.
For example, if three faces meet at a vertex and have the face weights weak, medium, and strong,then only the normal associated with the strong face will be used to set the final result.
Tools
反转方向
参考
| 模式: | 编辑模式 |
|---|---|
| 菜单: | Mesh ‣ Normals ‣ Flip |
This will reverse the normals direction of all selected faces.Note that this allows you to precisely control the direction(not the orientation, which is always perpendicular to the face) of your normals,as only selected ones are flipped.
重算法线方向
参考
| 模式: | 编辑模式 |
|---|---|
| 菜单: | 网格 ‣ 法向 ‣ 向外重算法线方向 和 网格 ‣ 法向 ‣ 向内重算法线方向 |
| 快捷键: | Ctrl-N 和 Shift-Ctrl-N |
These tools will recalculate the normals of selected faces so that they point outside(respectively inside) the volume that the face belongs to.The volume does not need to be closed; inside and outside are determined by the angles with adjacent faces.This means that the face of interest must be adjacent to at least one non-coplanar other face.For example, with a Grid primitive, recalculating normals does not have a meaningful result.
Set From Faces
参考
| 模式: | 编辑模式 |
|---|---|
| 菜单: | Mesh ‣ Normals ‣ Set from Faces |
Set the custom normals at corners to be the same as the face normal that the corner is part of.
Rotate
参考
| 模式: | 编辑模式 |
|---|---|
| 菜单: | Mesh ‣ Normals ‣ Rotate |
| 快捷键: | R N |
This is an interactive tool. As you move the mouse around, the selected normals are rotated.You can also invoke the Rotate Normals tool by typing the Rotate transform key, Rfollowed by N.
Point to Target
参考
| 模式: | 编辑模式 |
|---|---|
| 菜单: | Mesh ‣ Normals ‣ Point to Target |
| 快捷键: | Alt-L |
All selected normals are set to point from their vertex to the targetafter confirmed by Return or LMB.
A target is set by the keys:
- The mouse cursor M
- The pivot L
- The object origin O
- The cursor (set at this click) Ctrl-LMB
- A mesh item selection (set by this click) Ctrl-RMB.
- 模式
The tool operation can be modified; if one of the following keys has been previously pressed:
- Align A
- Then all normals will point in the same direction: from the center of selected points to the target.
- Spherize S
- Then each normal will be an interpolation between its original value and the direction to the target.
- Invert I
- Then the normal directions are reversed from what was specified above.
- Reset R
- Will reset the custom normals back to what they were when the operation started.
Merge
参考
| 模式: | 编辑模式 |
|---|---|
| 菜单: | Mesh ‣ Normals ‣ Merge |
Merge all of the normals at selected vertices, making one average normal for all of the faces.
Split
参考
| 模式: | 编辑模式 |
|---|---|
| 菜单: | Mesh ‣ Normals ‣ Split |
Split the normals at all selected vertices so that there are separate normals for each face,pointing in the same direction as those faces.
Average
参考
| 模式: | 编辑模式 |
|---|---|
| 菜单: | Mesh ‣ Normals ‣ Average |
Average all of the normals in each fan of faces between sharp edges at a vertex.
Copy Vectors
参考
| 模式: | 编辑模式 |
|---|---|
| 菜单: | Mesh ‣ Normals ‣ Copy Vectors |
If a single normal is selected, copy it to an internal vector buffer.
Paste Vectors
参考
| 模式: | 编辑模式 |
|---|---|
| 菜单: | Mesh ‣ Normals ‣ Paste Vectors |
Replace the selected normals with the one in the internal vector buffer.
Smoothen Vectors
参考
| 模式: | 编辑模式 |
|---|---|
| 菜单: | Mesh ‣ Normals ‣ Smoothen Vectors |
Adjust the normals to bring them closer to their adjacent vertex normals.
Reset Vectors
参考
| 模式: | 编辑模式 |
|---|---|
| 菜单: | Mesh ‣ Normals ‣ Reset Vectors |
Put normals back the to default calculation of the normals.
Select by Face Strength
参考
| 模式: | 编辑模式 |
|---|---|
| 菜单: | Mesh ‣ Normals ‣ Select by Face Strength |
Use the submenu to pick one of Weak, Medium, or Strong.Then this tool selects those faces that have the chosen face strength.
Set Face Strength
参考
| 模式: | 编辑模式 |
|---|---|
| 菜单: | Mesh ‣ Normals ‣ Set Face Strength |
Use the submenu to pick one of Weak, Medium, or Strong.Then this tool changes the Face Strength of currently selected faces to the chosen face strength.


